All about the Star Wars-esque scroll text in the Tube-based version of Elite
The 6502 Second Processor has a unique demo mode that only appears in this version. It shows off the improved speed of the 3 MHz 65C02 processor that sits at the heart of the famous wedge-shaped expansion box, though as you can't escape from the demo once it has started, it can get a bit annoying for seasoned players. Still, it's a bit of fun, if only for the first few times you see it...

The demo starts automatically if you leave the game idling at the title screen, or you can trigger it manually by pressing TAB. It is controlled by the DEMON routine, which has the following stages:
- "ACORNSOFT PRESENTS" scrolls up the screen like the opening of Star Wars
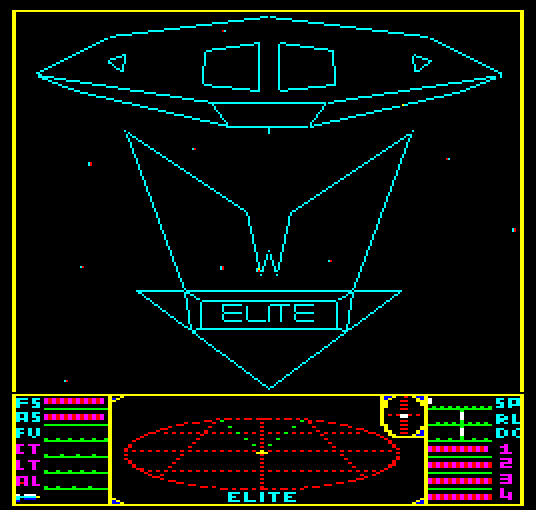
- The Elite logo appears from behind the camera, moving forwards into view and tilted back so it appears on-edge, with the bottom of the logo pointing towards the camera
- It then tilts forwards until it's fully vertical in front of the camera
- A Cobra Mk III flies in slowly from behind the camera at the top of the screen
- The Cobra fires its lasers at the logo, which explodes, and the Cobra flies on, in a clockwise roll, before pausing at the top of the screen
- "BY IAN BELL AND DAVID BRABEN" scrolls up the screen
- The camera speeds forward, the Cobra starts to fly again, pitching upwards as the camera overtakes it while it flies off the top of the screen
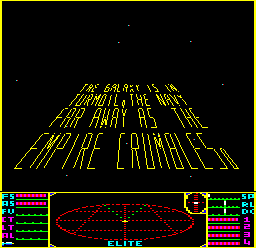
- "THE GALAXY IS IN TURMOIL, THE NAVY FAR AWAY AS THE EMPIRE CRUMBLES" scrolls up the screen
- An Adder appears in the middle of the screen and flies towards and past the camera, diving down and rolling clockwise just before it hits us

Interestingly, the game uses the existing spawning and ship-drawing routines to create the entire demo - even the scrolling text that rolls up the screen is made up of a set of lines in space that are displayed using the standard line-drawing buffer of the 6502 Second Processor version. Our Cobra Mk III is effectively a camera, speeding up, slowing down and panning when required, and the Elite logo is stored as a ship, with its own data block, vertices, faces and edges, just like every other ship. Perhaps that's why it slows down a bit as more text appears on-screen - there are lots more lines on-screen than in your average ship battle.
The ship-drawing routines are covered in plenty of detail elsewhere, so let's take a look at the scroll text in more detail.
Displaying the scroll text
--------------------------
The scroll text is implemented by the SLIDE routine. The first step is to write the scroll text onto a 2D canvas, laid out like this, starting with the first words in the top-left, as you would expect when writing on a piece of paper:
  (0, 254)              (256, 254)
          +------------+
          |            |      ^
          | On-screen  |      |
          |            |      |  scroll direction
          |............|      |
   ^      :            :
   |      :            :
  BALI    : Off-screen :
   |      :            :
   V      :            :
          +------------+
    (0, 0)              (256, 0)
The 2D letter-writing is done by the GRIDSET routine, which is explained in the next section.
Note that the y-axis is in the same direction as in the 3D space view, so the (0, 0) origin is in the bottom left, and y-coordinates get larger as you move up the canvas (and x increases towards the right, as you would expect).
BALI is a counter that goes from 254 to 2, and can be thought of as the y-coordinate of our eyes as we read through the scroll text from top to bottom, or, alternatively, how much of the canvas has yet to appear on-screen as the canvas scrolls into view.
Now take a point (X1, Y1) in the 2D scroll text canvas, like this:
            X1
          <--->

          +------------+
          |            |
          |    x       |
          |            |      ^       ^
          |            |      |       |
          |            |      |       | Y1 - BALI
          |            |      |       |
          |............|      |       v
   ^      :            :      |
   |      :            :      | Y1
  BALI    : Off-screen :      |
   |      :            :      |
   v      :            :      |
          +------------+      v
If Y1 < BALI, the point is off the bottom of the screen, so let's assume that Y1 >= BALI. This means that the value of Y1 - BALI is 0 for points at the bottom of the visible section, and higher for points near the top.
We can project the point (X1, Y1) onto the Star Wars scroll text to get a 3D space coordinate (x, y, z), with each coordinate being calculated as follows:
x = (x_sign x_hi x_lo) = X1 - 128
The x calculation moves the point (X1, Y1) to the left so the scroll text is in the centre, right in front of the camera (i.e. it shifts the x-coordinate range from 0-255 to -128 to +127).
y = (y_sign y_hi y_lo) = (Y1 - BALI) - 128
The y calculation moves the point (X1, Y1) down so that points at the bottom of the visible part of the canvas (those just appearing) will be at a space y-coordinate of -128, so the scroll text appears to come in from just below the bottom of the screen.
z = (z_sign z_hi z_lo) = ((Y1 - BALI) * 4 div 256) + #D
The z calculation tips the top of the 2D canvas away from the viewer by giving points higher up the canvas (i.e. those with higher y-coordinates) a higher z-coordinate, so the top of the canvas is further away (as the z-coordinate is into the screen). The #D configuration variable is the z-distance of the bottom of the visible part of the canvas as it scrolls into view. The scroll text then looks like a flat canvas disappearing into the distance because the z-coordinate is in a linear relationship with the y-coordinate (i.e. z = ky + d where k and d are constants).
We then project this space coordinate onto the screen for drawing, using the same process as when we draw ships. Couple this with some tables that we can use to store the projected lines, so they can be erased again later, and we can scroll the text in a Star Wars style by simply counting BALI from 254 down to 2, reprojecting the canvas and redrawing the scroll text with each new value.
Drawing letters on the scroll text
----------------------------------
As mentioned above, letters are drawn on the scroll text as if it were a flat 2D parchment, before any 3D transformations take place. The letter-writing is done in the GRIDSET routine, using letter shapes that are defined in the LTDEF table, which contains line definitions for each of the characters we can use in the scroll text.
Characters in the scroll text are drawn using lines on a 3x6 grid like this:
  .   .   .
  .   .   .
  .   .   .
  .   .   .
  .   .   .
  .   .   .
The spacing of the grid points is configured like this (in terms of space coordinates):
  0           .   .   .
  0.5 * WY    .   .   .
  1.0 * WY    .   .   .
  1.5 * WY    .   .   .
  2.0 * WY    .   .   .
  2.5 * WY    .   .   .

              4   8   12
so the vertical spacing is controlled by configuration variable WY. The default value of WY is 12, so the vertical grid spacing is 6, while the horizontal grid spacing is 4.
When drawing letters, only 12 of the 18 points can be used. They are numbered as follows:
  0   1   2
  .   .   .
  3   4   5
  .   .   .
  6   7   8
  9   A   B
The x-coordinate of point n within the grid (relative to the top-left corner) is given by the n-th entry in the NOFX table, while the y-coordinate is given by the n-th entry in NOFY. So point 0 is at (NOFX+0, NOFX+0) = (4, 0), and point 8 is at (NOFX+8, NOFX+8) = (12, 2 * WY).
The LTDEF table contains definitions for all the letters and some punctuation characters. Each definition consists of 5 bytes, with each byte describing one line in the character's shape (bytes with value 0 are ignored, so each character consists of up to five lines but can contain fewer lines).
The low nibble of each byte is the starting point for that line segment, and the high nibble is the end point, so a value of &28, for example, means "draw a line from point 8 to point 2".
Let's look at a few examples to make this clearer.
The definition in LTDEF for "A" is:
&60, &02, &28, &35, &00
This translates to the following:
  &60 = line from point 0 to point 6
  &02 = line from point 2 to point 0
  &28 = line from point 8 to point 2
  &35 = line from point 5 to point 3
  &00 = ignore
which looks like this on the grid:
  +-------+
  |   .   |
  +-------+
  |   .   |
  |   .   |
  .   .   .
The definition in LTDEF for "S" is:
&20, &03, &35, &58, &86
This translates to the following:
  &20 = line from point 0 to point 2
  &03 = line from point 3 to point 0
  &35 = line from point 5 to point 3
  &58 = line from point 8 to point 5
  &86 = line from point 6 to point 8
which looks like this on the grid:
  +-------+
  |   .   .
  +-------+
  .   .   |
  +-------+
  .   .   .
The definition in LTDEF for "," is:
&63, &34, &47, &76, &97
This translates to the following:
  &63 = line from point 3 to point 6
  &34 = line from point 4 to point 3
  &47 = line from point 7 to point 4
  &76 = line from point 6 to point 7
  &97 = line from point 7 to point 9
which looks like this on the grid:
  .   .   .
  .   .   .
  +---+   .
  |   |   .
  +---/   .
  _.-´.   .
Colons and semi-colons are shown as spaces (as their LTDEF definitions are all zeroes), so when a string like "TURMOIL,THE:NAVY" is displayed, the comma is shown as a comma, but the colon is shown as a space.
The scroll text has 16 characters per line, as the character width in #W2 is set to 16 by default, and the width of the whole scroll text is 256.