How to configure the anaglyph settings in Elite 3D
Anaglyph 3D is a difficult technology to work with, especially given the huge variety of screen distances, screen sizes, colour variations and 3D glasses - not to mention the differences in people's eye spacings and their varied abilities to perceive stereoscopic images. It's a wonder that it works at all.
Because anaglyph 3D is dependent on all these real-world factors, Elite 3D includes a handy configuration tool that lets you configure your 3D settings.
Not only that, but it doubles as a universe file viewer, so it can load and view scenes created by the Elite Universe Editor (though unlike the original editor, they get shown in 3D). Because 3D is often easier to see in static scenarios, this is a great place to play around with the anaglyph effect in Elite 3D without getting shot down.
Starting the configuration tool
-------------------------------
To enter the configuration tool, press f0 at the first title screen, i.e. the one that says "Load New Commander (Y/N)":
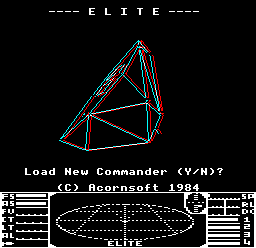
After pressing f0 there's a short pause, and you should then see this screen:
This is a sample universe file that you can use to fine-tune your settings and configure the anaglyph 3D effect. You can leave the configuration tool at any time by pressing ESCAPE, and you can press "R" to reset any changes you have made to the 3D configuration.
Note that if you are using an emulator, f0 is normally emulated by F10. If you are already in-game, you can get to the title screen by pausing the game with COPY (or End on most emulators) and pressing ESCAPE, and you can then press f0 (or F10) to enter the configuration tool.
Let's start by making sure you have the correct colour palette for your glasses.
Configuring the colour of your 3D glasses
-----------------------------------------
Elite 3D supports five different colour schemes to work with five different types of anaglyph 3D glasses. The default setting is red (left) and cyan (right), so if your glasses are this colour, you can probably skip to the next section - though note that some players find that even for red-cyan glasses, it can help to play with the palette, with a popular setting being the third option (left eye = red, right eye = green, both eyes = yellow).
If you have differently coloured glasses, then you can change the palette by pressing "P" in the configuration tool. This will cycle through the following palettes:
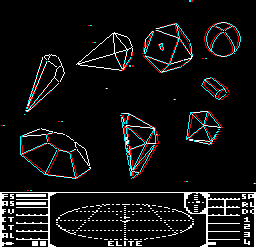
- Left eye = red, right eye = cyan. It shows white for both eyes:
- Left eye = red, right eye = blue. It shows magenta for both eyes:
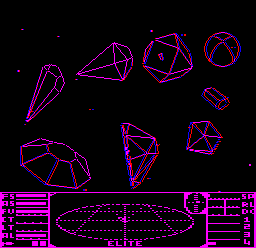
- Left eye = red, right eye = green. It shows yellow for both eyes:
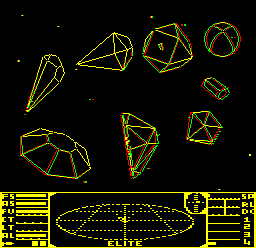
- Left eye = green, right eye = red. It shows yellow for both eyes:
- Left eye = green, right eye = magenta. It shows white for both eyes:

Now that you can view the screen with your particular pair of 3D glasses, let's look at the other configuration options that you can tweak.
Using the configuration tool
----------------------------
First, here's a summary of key presses in the configuration tool:
| Key | Details |
|---|---|
| f0 | Open the configuration tool from the main title screen |
| ESCAPE | Exit the configuration tool and return to the title screen |
| Left arrow | Decrease eye spacing (the current setting is shown in the SP speed indicator) |
| Right arrow | Increase eye spacing (the current setting is shown in the SP speed indicator) |
| Up arrow | Move the projection plane away from us (the current setting is shown in the energy banks in the bottom-right dashboard) |
| Down arrow | Move the projection plane towards us (the current setting is shown in the energy banks in the bottom-right dashboard) |
| D | Cycle through three levels of parallax ("depth of field") or disable parallax altogether (the current setting is shown by the number of missile indicators) |
| P | Cycle through five anaglyph 3D palettes (see above) |
| @ | Load a universe file from disc (see below) |
Now let's take a detailed look at how you can use the configuration tool to tailor your anaglyph settings to work for your particular setup. For more details about the terminology in the following, see the technical information.
- As mentioned above, press f0 at the first title screen to load the configuration tool, press ESCAPE to return to the game with the configuration settings retained, and press "R" to reset the eye spacing, parallax projection plane and parallax level to their defaults. This means you can play around with the settings as much as you like, and can just press "R" to go back to the start.
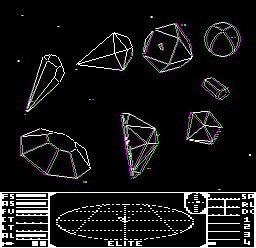
- The tool starts up by loading the SPIRAL universe file (shown above), which demonstrates the 3D effect nicely. You can load other universe files, and various examples are included on the Elite 3D disc - see below for details.
- Press the left or right arrow to decrease or increase the eye spacing.
- This controls the separation of the left and right projections for each of the individual eyes. A higher eye separation will increase the feeling of "solidity" of the 3D objects, but it will also introduce more separation between the left and right images that makes it harder for your eyes to resolve the 3D effect. See the technical information for more details.
- The default eye separation is 2.
- The current setting is shown in the speed indicator on the dashboard ("SP").
- Press the up or down arrow to move the parallax projection plane (or "focus point") further away or closer.
- This controls the z-coordinate of the projection plane. Moving this this move the "focus point" of the scene; objects beyond the plane will appear to be into the screen, while objects this side of the plane will "pop out" of the screen. See the technical information for more details.
- This affects ships and explosion clouds only (it doesn't affect the sun, planet, stardust or scanner, as their parallax is fixed).
- The default z-axis distance of the projection plane is 4.
- The current setting is shown in the energy banks, starting with bank 4 in the bottom-right of the dashboard.
- Each key press moves the plane by 1 (for reference, each keypress moves the plane by the distance between us and the Cobra on the game's opening title screen).
- You will hear a beep if you try to move the plane closer than the player (i.e. closer than 0).
- To see this in action, load the PLANE universe file from drive 0. The PLANE file has an asteroid placed on each projection plane distance from 1 to 11, so it's designed to show off the effect of moving the plane through each asteroid in turn. It looks like this:
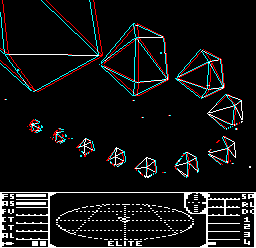 As you press the up/down arrow, you should be able to see the projection plane moving through the asteroids one at a time, so that the other asteroids either appear in front of or behind the asteroid that's on the projection plane.
- Press "D" to cycle through three levels of parallax (or "depth of field").
- This controls the amount of extra parallax added to the acene. A higher level of parallax enhances the feeling of depth, but it also introduces more separation between the left and right images that makes it harder for your eyes to resolve the 3D effect. See the technical information for more details.
- The default parallax level is medium (2).
- The current level are shown as the number of missiles (white squares) in the bottom-left corner, as follows:
- 0 = disable parallax altogether
- 1 = low parallax
- 2 = medium parallax (the default)
- 3 = high parallax
- Level 3 is difficult for most people to resolve, while level 1 is much more subtle.
- This change affects the level of parallax for ships, explosion clouds, suns and planets. It doesn't affect the stardust or scanner, as their parallax levels are calculated according to their own specific depths of field.
- Press "P" to cycle through the five anaglyph 3D palettes shown above.
- The default palette is for glasses with left eye = red, right eye = cyan.
- Press "@" to load a new universe file.
- You can choose from the following files that are bundled with the game on drive 0:
- BOXART1, BOXART2, MANUAL, SHIPID, SHIPID6 come with the Elite Universe Editor. See the documentation for the Elite Universe Editor for details of these files. They all work pretty well in 3D except for BOXART1, which is a bit of a mess (but it's also a bit of a mess in 2D, to be fair).
- PLANE shows an asteroid on each projection plane from 1 to 11. It's useful for calibrating the projection plane, as described above.
- SPIRAL shows a spiral of ships coming out of the screen. This is the default file that's loaded when you open the configuration tool.
- VIPERS shows a line of Vipers going into the distance.
- You can also create your own scenes in the Elite Universe Editor and load them into the anaglyph 3D version of Elite to see them in three dimensions.
- You can choose from the following files that are bundled with the game on drive 0:
For more details on how the anaglyph 3D code works in Elite, and for more information about eye spacing, projection planes and parallax, see the technical information.