Details of how Elite 3D works
Anaglyph 3D is a bit of a mindbender, and getting the algorithm wrong can literally make you boggle-eyed; for quite a long period during the development of Elite 3D, I was accidentally applying the eye separation in the wrong direction, and it took me ages to work out why I was getting mildly cross-eyed every time I wore my coloured glasses. But I've made these developmental mistakes so you don't have to, so here's a technical breakdown of how I've modified the 6502 Second Processor version of Acornsoft Elite to incorporate the third dimension, 1980s-style.
You can see all the code changes in the project's accompanying repository, in the anaglyph-3d branch of the elite-source-code-6502-second-processor repository. If you search the source code for "Mod:" then you will find every change I've made to the original 6502 Second Processor version of Elite. The changes are split between the parasite and I/O processor sources, as appropriate.
Let's start with a quick overview of anaglyph 3D, before moving on to the actual implementation.
A short summary of anaglyph 3D
------------------------------
In essence, we see in three dimensions because we have two eyes that point in the same direction, and which are set apart from each other. Each eye sees the world in two dimensions but from a slightly different position, and our brains combine these two 2D images into a spatially aware three-dimensional image. Of course, this is a huge simplification of the complex world of eyesight, but it's good enough to explain the basis for anaglyph 3D.
The core idea behind anaglyph 3D is to combine both the left and right 2D eye images into a single 2D image that we can display on a screen. Glasses with different-coloured lenses then allow the left eye to see only the left image and the right eye to see only the right image. As long as we ensure that the left and right images that are encoded into the screen differ as they would in the real world, the brain will get tricked into thinking that it is seeing a three-dimensional image. For a much more detailed look at how the effect works, see the Wikipedia entry on anaglyph 3D.
For the purposes of adding anaglyph 3D to Elite, we therefore need two things: a way of combining two images into one that will work with anaglyph glasses, and a way of generating those two images in-game and in real time. The first one requires a special anaglyph 3D palette, which we'll look at next, and the second one uses eye separation, skew and parallax, which we'll look at below.
The anaglyph 3D palette on a BBC Micro
--------------------------------------
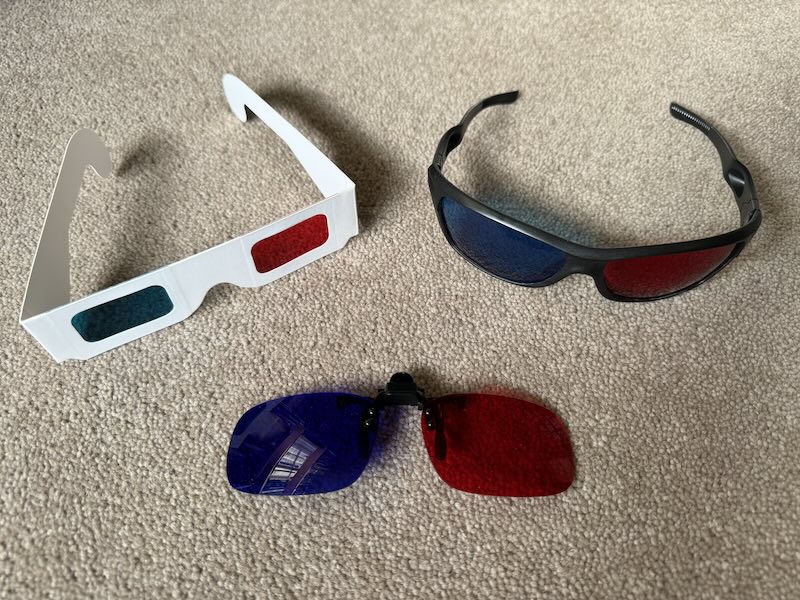
The most common anaglyph 3D glasses have a red lens for the left eye and a cyan lens for the right eye, like the top two pairs below; you will also find red and blue glasses, like the clip-on lenses at the bottom:
In a typical anaglyph image, the left-eye image is therefore shown with a red filter applied and the right-eye image is shown with a cyan filter applied; the two images are then printed on top of one another on paper, or they're merged together on a screen. Only red light passes through the left eye's red lens, so the left eye only sees the red left image, and only cyan light passes through the right eye's cyan lens, so the right eye only sees the cyan right image. The two colours are chosen so they're opposite - cyan light does not pass through a red lens, and red light does not pass through a cyan lens.
With modern technology this is a pretty easy effect to implement, and graphics engines and image editors often contain add-ons or filters that will generate anaglyph images from photographs with little more than a click or two.
Not surprisingly the BBC Micro doesn't come with anything remotely like a graphics engine, so we have to roll our own. The solution is to choose a four-colour screen mode, where we show the left-eye image in red and the right-eye image in cyan, all on a black background, and when a pixel is coloured in both eyes, we draw it in white. This works because white light contains both red and cyan light, so it passes through both the red and cyan lenses; the result is that the left eye only sees red and white pixels but not cyan pixels, and the right eye only sees cyan and white pixels but not red pixels.
If you look at the following screenshot, you can see clearly the red and cyan images side-by-side, and where they coincide, they are white:
In terms of implementation, we can use exclusive-or (EOR) plotting to support both eyes on the same screen at the same time. EOR plotting looks at what is already on-screen and EORs our new pixel into the screen, rather than simply overwriting what's there. In Elite, EOR-plotting the space view means we can draw a wireframe on-screen, and then redraw the same wireframe to erase it; this is because 1 EOR 1 = 0, so drawing a white pixel on top of a white pixel will turn that pixel black. For more details of EOR plotting and how it is used in Elite, see the deep dive on drawing monochrome pixels in mode 4.
The 6502 Second Processor version of Elite has a four-colour space view rather than the monochrome space view of the original BBC Micro release, so it has the right number of colours for an anaglyph image. The space view uses screen mode 1, so to support our anaglyph 3D palette, all we need to do is define the screen palette as follows:
- Colour 0 = %00 = black
- Colour 1 = %01 = cyan
- Colour 2 = %10 = red
- Colour 3 = %11 = white
If we draw one eye in colour 1 (cyan) and the other eye in colour 2 (red), and we use EOR plotting, then we can draw cyan pixels without affecting the red pixels (as cyan pixels are drawn into bit 0 of each pixel), and we can draw red pixels without affecting the cyan pixels (as red pixels are drawn into bit 1 of each pixel). For pixels that are set in both eyes - i.e. both red and cyan - then we end up with both bits set, giving colour %11 (3), which we define as white. In essence we are creating two bitplanes, one in cyan and the other in red, and when both bitplanes are populated, we define the combined result to be white. If you want to know more about bitplanes, see the deep dive on bitplanes in NES Elite.
The fact that Elite already uses EOR plotting to draw everything in the space view makes life so much easier for us, and adding anaglyph 3D is a relatively straightforward process - we just set the colour to red and draw the left-eye image using the existing routines, and then we set the colour to cyan and draw the right-eye image. We don't need to change the graphics engine at all, as it already does exactly what we want.
The three stages of anaglyph 3D
-------------------------------
Now that we have a way of drawing two different eye images onto the same screen, we now need to work out what to draw. I have implemented three different anaglyph algorithms in Elite 3D, as follows:
- Eye separation is used to project two different images, one from each eye, with the eyes separated horizontally. This can be thought of as giving "solidity" to 3D objects.
- Skew is used to bring objects at a specific distance into focus (that distance is known as the "projection plane"). This can be thought of as the "focal point" of the image.
- Parallax is used to amplify the feeling of distance to where objects sit, both into and out of the screen. This can be thought of as adding a "depth of field" to the result.
Let's run through these in turn, starting with eye separation.
Eye separation
--------------
To apply eye separation, we project the 3D world onto the 2D screen twice, once from the camera viewpoint of the left eye, and again from the camera viewpoint of the right eye. For objects in the far distance these viewpoints will be very similar, but for close-by objects, they can be very different; hold something in front of your nose and cover up each eye in turn, and you'll see what I mean. The left eye gets to look around the left side of the object, while the right eye gets to look around the right side of the object, so the information in the combined images gives closer objects a more solid feel, giving the objects more depth.
Also, when you look through your left eye at a close-by object, the object appears towards the right of the overall image, and when you look through your right eye, the object appears towards the left; faraway objects, however, don't move at all, and look the same in both eyes. So when we draw both images on-screen and put on our anaglyph 3D specs, distant objects will appear in white as their images overlap, but close-by images will separate more, with a bigger separation the closer they are to us. The effect is that every object feels as if it is this side of the screen, as the colour separation makes our eyes converge and go slightly cross-eyed, like when you try to look at the end of your nose.
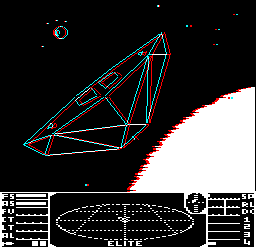
To see this in action, take a look at the following screenshot:
The Cobra is close to us, so the left eye's red image appears to the right and the right eye's cyan image appears to the left. When looking at this through anaglyph 3D specs, our eyes converge on each line, and we perceive this as an object that is in front of the screen.
The amount of eye separation can be configured in the configuration tool; see the page on configuring Elite 3D for details.
Skew
----
Clearly, we can't play Elite in 3D if every object is in front of the screen; not only would this be exhausting for our poor crossed eyes, but we'd be missing out on a whole universe on the other side of the screen. The solution to this is to add skew.
To understand skew, we need to talk about the projection plane. The projection plane is parallel to the screen, and we conceptually place it at the distance into the screen, along the z-axis, where we want the eyes to focus; if you imagine holding a piece of paper in front of you and moving it into the screen until it reaches the place where we want to focus our eyes, then this is essentially what the projection plane looks like. By default, Elite 3D places the projection plane at a distance of &400 coordinates into the screen; for reference, the Cobra Mk III on the game's opening title screen is a distance of &100 coordinates into the screen at its closest point.
As discussed in the previous section, if we look at the anaglyph image that's composed of the two separate eye projections, then distant objects are mainly white as their left- and right-eye images coincide and overlap, while closer objects have a red left-eye image that is further to the right, and a cyan right-eye image that is further to the left. Our eyes naturally focus on the white images as they don't need to be combined by our brains from two separate images, so if we want to bring an object at a certain distance into focus (specifically an object on the projection plane), then we need to shift the two images left and right so that specific object appears in white. Then that object and everything else at that distance will be in focus, and everything beyond that object will appear to be behind the screen, while everything in front of the object will still be this side of the screen (but not as close as before).
So all objects in the standard eye-separated image appear to be this side of the screen, with the red left-eye image on the right and the cyan right-eye image on the left. This means we can make the eyes coincide by moving the red left-eye image to the left and the cyan right-eye image to the right. If we move both images by the correct amount so they coincide for objects on the projection plane, then the focus will be centred on the projection plane. This process is known as skewing, and the amount we move the images is the amount of skew.
So the skew calculation is easy enough; we take the standard eye-separated image and calculate the separation of the two eye images at the distance of the projection plane, and we then skew both images by that distance, moving the left eye to the left and the right eye to the right so the images coincide for objects on the projection plane.
To see this in action, take a look at the following screenshot:
The leftmost edge of the space station has a subtly different line in the left and right eyes, while most of the middle portion of the station is white. This means the left eye (the red lens) sees the leftmost edge (the red line) a little more to the left when compared to the cyan right eye. This is because the station is a fair distance away - beyond the plane of projection - so instead of our eyes converging on a close object, they now diverge slightly, which is interpreted by our brains as a more distant object. The laser sights are white, which means they appear on the projection plane, and if you look at this image through anaglyph 3D glasses, the station does indeed appear to be further away than the laser sights.
In contrast, the Transporter in the top-right corner has the red left-eye image further to the right, because it is closer than the projection plane, as it is flying out of the station and slightly towards us. When looking at this wireframe, our eyes converge and we go slightly cross-eyed, just as we do when looking at close-by objects.
The projection plane can be moved in the configuration tool; see the page on configuring Elite 3D for details.
Parallax
--------
The final stage in Elite 3D's anaglyph is to add some parallax. The eye separation and skew calculations do a good job of adding three dimensions, and they are technically enough on their own, but I found that adding an extra twist helps make those ships really pop into and out of the screen.
Adding parallax effectively increases the depth of field, so objects feel more distant or closer. It's a simple calculation; given a vertex in space, we simply calculate the distance in the z-axis between the vertex and the projection plane, giving positive values for vertices beyond the plane, negative values for vertices this side of the plane, and a value of zero for vertices on the plane. We then scale this distance by the parallax level (which we can configure to be off, low, medium or high) and move the vertex along the x-axis by the result.
This means that for objects beyond the projection plane, we move the left eye to the left and the right eye to the right, so our eyes diverge more and appear to be more distant; this is known as positive parallax. On the other side, for close-by objects, we move the left eye to the right and the right eye to the left, so our eyes converge more (i.e. go more cross-eyed), and objects appear to be closer.
By adjusting the level of parallax, we make the scene feel deeper, but at the cost of more separation. Not everyone can resolve large separations, so choosing too much parallax can be a deal-breaker.
The parallax level can be configured or disabled altogether in the configuration tool; see the page on configuring Elite 3D for details.
Applying anaglyph 3D to Elite
-----------------------------
Now that we've covered eye separation, skew and parallax, here's a summary of how I've applied them to the ships, planets, suns, scanner and stardust in Elite 3D.
- For the wireframe ships, stations, asteroids and canisters, I apply all three methods: I generate each eye view separately, according to the configured eye separation, and then apply skew to bring the projection plane into focus. I then apply positive or negative parallax according to the z-distance between the ship and the projection plane, to enhance the depth of field.
- For the planet and sun, I apply the maximum configured positive parallax only, as they are too distant for the eye separation and skew to make any difference.
- For stardust and ship sticks on the scanner, I apply positive or negative parallax according to the z-distance, but using different scales to the ships (as they do not share the same 3D space as the ships, planet and sun).
- For the scroll text in the demo, I generate each eye view separately, according to the configured eye separation, and add skew just as for ships. However I don't add parallax, as it makes the text jump noticeably when the parallax gets rounded to the next integer, and this spoils the smooth-scrolling effect.
- For our lasers, I apply negative parallax so the lasers appear to come from our side of the screen, hitting the laser sights on the projection plane.
- For enemy lasers, I apply positive parallax so the lasers appear to come from the gun vertex on the enemy ship and hit our ship on the projection plane. This means that once a ship gets closer than the projection plane the laser effect won't be correct, but as almost all laser fire is done from a distance and combat is frenetic, it's very difficult to spot.
As you can see, there is a fair amount of smoke-and-mirrors here. The only fully 3D objects in Elite are the wireframe ships, so only they can get the full three-stage treatment, but accuracy is less important for things like stardust, especially when they already move in a way that imparts a 3D effect. After all, pancake Elite in 2D is hugely immersive and is indisputably a 3D game, so all the anaglyph has to do is beckon us along the same path; we already want to see the game in 3D, so sometimes smoke and mirrors are all we need to do the job.
Finding enough memory for anaglyph 3D
-------------------------------------
Elite 3D needs a fair amount of extra memory when compared to the original version. Luckily there is a bit of spare memory when Elite runs in the 6502 Second Processor, though not as much as you might think; Elite 3D needs pretty much all of it.
The main memory requirements are for the various graphics caches, as we're effectively drawing everything twice. Here are the details:
- Each ship's line heap is double the size, as we now need to store the line coordinates for both the left and right eyes. The first half of the heap is used for the left eye, and the second half for the right eye. This means that the game can only support around half the number of concurrent ships as the standard 6502 Second Processor version, but this just brings that figure down to around the same as the normal, non-co-processor game.
- We also need a second calculation heap for storing projected coordinates, as we project each eye concurrently, one vertex at a time. The original heap is at XX3 (&0100) and takes up a maximum of 164 bytes, so it occupies the first two-thirds of page 1, leaving the rest of page 1 for the 6502 stack. There isn't enough room to double the size of the XX3 heap in-place without overwriting the stack, so instead we need to allocate a separate heap for the right eye, at XX3r.
- The space station's line heap is stored in the same place as the sun line heap. There is almost room for twice the station line heap in the sun line heap - it turns out we only need nine more bytes to cater for double the number of lines in the more complex Dodo space station.
- We don't need to increase the size of the sun line heap, as we can add anaglyph 3D fringes to the sun algorithmically, using the same centre-and-half-width approach as in the standard game.
- Planets and circles store their lines in the ball line heap, so we need to add a second set for the right eye, at LSX2r and LSY2r. We also need a second ball line heap pointer, which we add in LSPr.
The extra anaglyph 3D code also needs to be squeezed into memory, which we can do as follows:
- Rearrange the UP and WP workspaces and load the main game code at &0E20 instead of &1000.
- Use the block of free memory at F%, from &818F to &8200.
- Use the block of free memory after the end of the main game code, from &F102 to &F800.
- Move the I/O processor code down by 256 bytes to &2200. This still leaves enough room for most sideways ROM workspace requirements in a BBC Micro parasite.
See the 6502 Second Processor Elite memory map for more details on the layout of the game in memory.
Applying anaglyph 3D to ships
-----------------------------
Here's a brief breakdown of the extra anaglyph code that I've added to the main ship-drawing routines, in case you want to follow along with the source code.
- LL9 (Part 1)
- Set rHeap(1 0) to the address of the second half of the ship's line heap (right eye)
- LL9 (Part 7)
- Calculate the 3D coordinates of the current vertex, moving them left and right by the eye separation
- Store the x-coordinate for the left eye as usual
- Store the x-coordinate for right eye in xRightEye(1 0)
- LL9 (Part 8)
- Project the left eye line onto the screen and save the results in the XX3 heap
- Project the right eye line onto the screen and save the results in the XX3r heap
- Apply skew to the x-coordinates in XX3 and XX3r, according to the value of zPlane(1 0)
- Apply parallax to x-coordinates in XX3 and XX3r according to the z-distance from the plane
- LL9 (Part 9)
- Draw the enemy laser lines in each eye, if an enemy is firing at us
- If the laser line is only visible in one eye, draw the other eye as a null line (Y2 = 255) to keep the two heaps in sync
- LL9 (Part 10)
- Clip both eyes' lines
- LL9 (Part 11)
- Draw both eyes' lines into the ship line heap
- Store the left eye coordinates in the first half of heap, as usual, and store the right eye coordinates in the second half of heap, at rHeap(1 0)
- If only one eye's line is visible, draw the other eye as a null line (Y2 = 255) to keep the two heaps in sync
- Loop back to part 10 until all the edges are drawn
- LL9 (Part 12)
- Draw both eyes' lines from the ship line heap, one in red and the other in cyan, using the flicker-free algorithm from the BBC Master
- SHPPT
- Draw ship dots for both eyes, after adding eye separation and skew
- ADDBYT (I/O processor)
- When lines are sent to the I/O processor for drawing, skip any null lines (i.e. ignore any lines where Y2 = 255)
Applying anaglyph 3D to the sun
-------------------------------
The sun in Elite is drawn as a set of raster lines. The details are stored in the sun line heap, which consists of the x-coordinate of the centre vertical line of the sun, and a half-width value for each pixel line in the space view (see the deep dive on drawing the sun for details). The sun line heap is pretty large, so to save duplicating the heap for a second eye, we can use the same heap values as in normal 2D Elite, and simply apply parallax to the sun lines algorithmically, as we draw them.
The easiest place to add parallax is in the HLOIN routine in the I/O processor. This routine draws each horizontal sun line, given the line's y-coordinate, the x-coordinate of the sun's centre, and the half-width of the sun line at that point. To add a 3D effect, all we need to do is draw a 3D horizontal line rather than a 2D one, and we're done.
How do we do that? Well, the sun is in the far distance so we only need to add the currently configured maximum positive parallax to make it appear in the far distance, so given a sun line from the 2D sun line heap, we can change this into an anaglyph 3D line by shifting the line left to get the red line for the left eye, and shifting it right to get the cyan line for the right eye. All we need to do for each frame, then, is to draw both left- and right-eye sun lines as they appear on-screen to erase them (using the values in the sun line heap), and then redraw them both in their new positions. This will give us a 3D sun that updates every frame.
Unfortunately it isn't that simple: if we do this, then it works, but the sun not only flickers, with black horizontal lines dancing over its surface, but it's also extremely slow. What is going on?
The problem is that the original 2D line-drawing algorithm contains some elegantly beautiful mathematical magic that works out how to redraw each sun line while minimising the amount of change required, so we don't alter pixels that remain white between the old sun and the new sun; instead we just update the pixels that change between frames. This not only stops the sun from flickering, but it minimises the amount of drawing required, and that really speeds things up as the sun can contain an awful lot of white pixels. You can see this calculation in part 3 of the SUN routine in the original BBC Micro version.
So we somehow need to replicate this system of minimising change, but in 3D. I do this by updating the code in the parasite that checks whether we are replacing a sun line with a new one, but instead of applying the clever algorithm before sending the sun line to the I/O processor, I simply send both the old and the new sun line to the I/O processor without applying the algorithm at all. And as I send the first line, I set the y-coordinate to 255, which flags this as the first line in a before/after pair.
The I/O processor looks for lines with Y1 = 255, and when it does it knows this is the first line in a before/after pair, so it waits for the second line to arrive. When it does, the I/O processor applies the clever algorithm from the original game's main game code, but it only applies it to the white part of the sun line where the two eyes overlap, so this part gets drawn in a flicker-free manner. There's no need to be so careful with the coloured fringes, as they flicker anyway, but this two-step approach makes the anaglyph 3D sun both smooth and fast, just like the original 2D sun.
Applying anaglyph 3D to planets
-------------------------------
When it comes to drawing the planets in 3D, we want to avoid duplicating the circle and meridian/crater calculations, as they contain some complex maths and are therefore pretty expensive in terms of CPU time. As the planet is always in the far distance, we only need to add the currently configured maximum positive parallax to the planet to get each eye - the left and right versions of the planet can be identical, they just need to be moved sideways in opposite directions. This means we only need to calculate the circle coordinates once, and then translate the result to the left and right.
To do this, we calculate the circle's screen coordinates, as in the original Elite, and save the results in in XX3r (for the planet circle) and XX3 (for the crater or meridians) via the routines at BLINEHeapPlanet (for the planet) and BLINEHeapCrater (for the crater or meridians).
We can then draw the left and right eyes on-screen by applying parallax in the DrawAnaglyphPlanet routine. This calls the BLINE routine for each eye. To get BLINE to work with one eye and then the other, I've recoded the routine to look up all heap-related addresses from vectors, which get set by UseLeftBallLine and UseRightBallLine. Specifically, the LSX2S(1 0) vector points to either LSX2 or LSX2r, the LSY2S(1 0) vector points to LSY2 or LSY2r, and the LSPS vector points to LSP, so we can use the same BLINE routine to draw the ball line from each heap individually, changing colour each time.