Configuring all the different views in the console version
Elite has always had a lot of different screen designs (or "views" as they're known), and the type of the current view is stored in the zero-page variable QQ11. The original BBC Micro cassette version supports nine different view types from 0 to 128 (see QQ11), with later versions adding more types into the mix. The NES version takes this view system and revamps it so the view type not only contains the view number, but also a bunch of metadata about the view.
Let's start by running through the NES version's large collection of views, before talking about transitioning between views and all the view-related routines in the codebase.
Views in the NES version
------------------------
The view type is still stored in the QQ11 variable in the NES version, but it has been extended so the low nibble contains the view number (which is now in the range 0 to 15) and the high nibble contains metadata about the view. This not only allows more information to be stored in the view type, but it also allows views to have multiple statuses that we can track as views get drawn.
The low nibble contains the view number, as follows:
| Number | Type | Name | View |
|---|---|---|---|
| 0 | $x0 | Space view |  |
| 1 | $x1 | Title screen |  |
| 2 | $x2 | Mission 1 briefing: rotating ship |  |
| 3 | $x3 | Mission 1 briefing: ship and text |  |
| 4 | $x4 | Game Over screen |  |
| 5 | $x5 | Text-based mission briefing |  |
| 6 | $x6 | Data on System |  |
| 7 | $x7 | Inventory |  |
| 8 | $x8 | Status Mode | 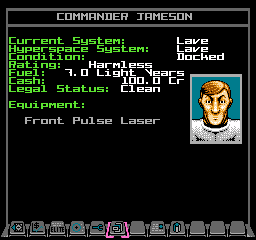 |
| 9 | $x9 | Equip Ship |  |
| 10 | $xA | Market Price |  |
| 11 | $xB | Save and Load | 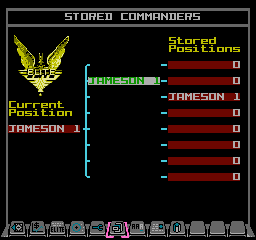 |
| 12 | $xC | Short-range Chart |  |
| 13 | $xD | Long-range Chart |  |
| 15 | $xF | Start screen |  |
Note that view number 14 ($xE) is unused.
The high nibble contains four configuration bits, as follows:
- Bit 4 clear = do not load the normal font
Bit 4 set = load the normal font - Bit 5 clear = do not load the highlight font
Bit 5 set = load the highlight font - Bit 6 clear = icon bar
Bit 6 set = no icon bar (rows 27-28 are blank) - Bit 7 clear = dashboard (icon bar is on row 20)
Bit 7 set = no dashboard (icon bar is on row 27)
The normal font is colour 1 on a background of colour 0 (typically white or cyan on black), and the highlight font is colour 3 on a background of colour 1 (typically green on white), though view $BB (Save and load) displays the normal font as colour 1 on a background of colour 2 (white on red). For more details about the two different fonts and how they get loaded into the pattern tables, see the deep dive on fonts in NES Elite.
Most views have the same configuration every time the view is shown, but $x0 (the space view), $xB (Save and load), $xD (Long-range Chart) and $xF (Start screen) can have different configurations at different times, typically working through the states as the view is loaded.
Note that view $FF is an exception to the above rules, as no fonts are loaded for this view, despite bits 4 and 5 being set. This view represents the blank screen between the end of the Title screen and the start of the demo scroll text.
The complete list of view types used in NES Elite is as follows:
  $00 = Space view
        No fonts loaded, dashboard

  $10 = Space view
        Normal font loaded, dashboard

  $01 = Title screen
        No fonts loaded, dashboard

  $92 = Mission 1 briefing: rotating ship
        Normal font loaded, no dashboard

  $93 = Mission 1 briefing: ship and text
        Normal font loaded, no dashboard

  $C4 = Game Over screen
        No fonts loaded, no dashboard or icon bar

  $95 = Text-based mission briefing
        Normal font loaded, no dashboard

  $96 = Data on System
        Normal font loaded, no dashboard

  $97 = Inventory
        Normal font loaded, no dashboard

  $98 = Status Mode
        Normal font loaded, no dashboard

  $B9 = Equip Ship
        Normal and highlight fonts loaded, no
        dashboard

  $BA = Market Price
        Normal and highlight fonts loaded, no
        dashboard

  $8B = Save and Load
        No fonts loaded, no dashboard

  $BB = Save and Load
        Normal and highlight fonts loaded, special
        colours for the normal font, no dashboard

  $9C = Short-range Chart
        Normal font loaded, no dashboard

  $8D = Long-range Chart
        No fonts loaded, no dashboard

  $9D = Long-range Chart
        Normal font loaded, no dashboard

  $CF = Start screen
        No fonts loaded, no dashboard or icon bar

  $DF = Start screen
        Normal font loaded, no dashboard or icon bar

  $FF = Segue screen from Title screen to Demo
        No fonts loaded, no dashboard or icon bar
Although it is technically possible to configure a view to only load the highlight font and not the normal font, in practice this isn't done. In terms of fonts, these are the only configurations used:
- No font is loaded
- The normal font is loaded
- The normal and highlight fonts are loaded
- The normal and highlight fonts are loaded, with special colours for the normal font
As noted above, the last one is only used for the Save and Load screen.
Fading between views
--------------------
Transitioning between different views is much improved in the NES version. When changing views, the FadeToBlack routine slowly fades the current view to black over the course of the next four VBlanks. While the view is faded to black, we can remove the old view and draw the new one without worrying about NMIs, VBlanks and the PPU, as any screen corruption will be invisible as every colour in the palette is black. When the new view is ready, the FadeToColour routine reverses the effect and the screen fades into view over the course of another four VBlanks.
A new variable, QQ11a, is used to store the old view type when changing views. When we decide to change view, QQ11 gets set to the new view number straight away while QQ11a stays set to the old view type, only updating to the new view type once the new view has appeared. This is useful when switching views as it allows us to work out what we need to change when we're in-between views and the screen has faded to black.
The fading process makes the most of the way colours are implemented on the NES. Colours on the NES are stored as hue and value, using an HSV model but without the saturation. Specifically the hue (i.e. blue, red etc.) is stored in the low nibble, while the value (i.e. the brightness) is stored in bits 4 and 5 of the high nibble. Bits 6 and 7 are unused and are always zero.
This means that given a colour value in hexadecimal, it is in the form $vh where v is the value (brightness) and h is the hue. We can therefore alter the brightness of a colour by increasing or decreasing the high nibble between 0 and 3, with $0h being the darkest and $3h being the brightest.
The fadeColours table lets us fade colours with a quick lookup, which saves having to extract the high nibble, decrement it and put it back. Given a colour $vh, the table entry at fadeColours + $vh contains the same colour but with a reduced brightness in $v. Specifically, it returns the colour with a brightness of $v - 1. We can therefore use this table to fade a colour to black, which will take up to four steps depending on the brightness of the starting colour (and the same table is used to fade colours back from black once the view is ready).
The effect is subtle but rather pleasing.
Loading static patterns
-----------------------
As well as loading fonts, each view loads a set of static patterns into both pattern tables. For example, this space view:
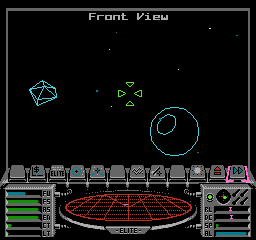
contains the following fixed patterns in pattern table 0:
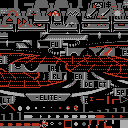
Almost all views contain these fixed patterns. They come in two blocks: there are the icon bar patterns at the start of the table, and the dashboard patterns from pattern 69 to the end.
- The icon bar patterns at pattern 0 are loaded in the NMI handler, after being configured in ShowIconBar or UpdateIconBar.
- The SendViewToPPU routine decides which other patterns to load for the new view, and for the space view shown above, it loads the dashboard image data from dashImage into patterns 69 to 255 in pattern table 0. The actual loading is done by calling the SendDashImageToPPU routine.
The SendViewToPPU routine is also responsible for loading patterns for the system and commander images, if required, as well as any other graphics that the new view needs. It sends these patterns straight to the PPU without waiting for the NMI handler, as we don't need to worry about corrupting the screen (as it's already faded to black by this point).
View routine naming conventions
-------------------------------
There are lots of routines that deal with setting up new views and sending the correct data to the PPU. I have tried to use a clear naming convention for these different routines, to make things easier to follow.
- Routines that end in "ToPPU" send data to the PPU immediately, without worrying about VBlank. For example, SendViewToPPU sends the new view data to the PPU, SendBitplaneToPPU sends a bitplane to the PPU, and SendSpaceViewToPPU configures a new space view and sends it to the PPU.
- Routines that end in "InNMI" configure the NMI handler to start sending data to the PPU in the next appropriate VBlank. For example, SetupViewInNMI sets up the new view before configuring the NMI handler to send it to the PPU, DrawBitplaneInNMI configures the NMI handler to send the specified bitplane to the PPU, and DrawScreenInNMI configures the NMI handler to send the screen to the PPU.
- Routines that start with "Update" decide whether to send data to the PPU immediately or go via the NMI handler and VBlank. For example, routines like UpdateScreen, UpdateView and UpdateHangarView check whether the screen is faded before deciding how best to send the view data.
As in the original Elite, TT66 is still the core routine for changing views, but in NES Elite there are lots of other routines too. Hopefully the naming convention above will help make things a little easier to understand...