The beautiful pixel art of the commander and system images
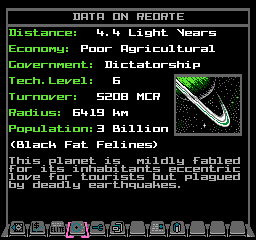
Of all the extra graphical touches that the authors added to the NES version of Elite, the most beautiful are the colourful system images from the Data on System screen. Here, for example, are the stunning green rings around Reorte:
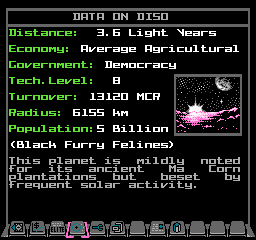
And here's the famous purple vista of everybody's favourite short-hop destination, Diso:
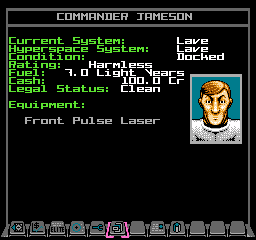
As well as the glorious system images, the Status Mode screen has a slightly less beautiful but no less entertaining rendering of the current commander, whose appearance changes as you make money and progress through the ranks. Here we are at the start of the game, as a poor pilot with a Harmless rank:
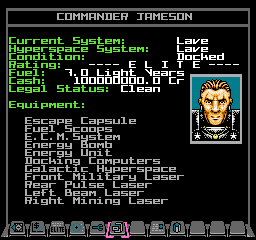
And here we are at the end-game, with pots of money and an Elite rating:
Let's see how these colourful images are displayed, and take a look at the whole range of system and commander images.
Two-layer composition
---------------------
If you look closely at these images, they appear to have more colours than the NES screen supports. On the NES, each 2x2-tile part of the screen has the same palette applied to it, as defined in the attribute table, so the same four colours apply to each 16x16-pixel block. These colours have to include the background colour, which is defined as black in Elite, so NES images should only have three additional colours in each 16x16-pixel block.
But look at this rather lovely example of a system image:

At 64 pixels wide and 56 pixels high, this image is four attribute blocks wide and 3.5 blocks tall. Let's look at one of these attribute blocks, from the middle of the image:

I can count six colours in this block: there are two shades of purple, a red, a white, a grey and a black. So what is going on here?
The answer is that the system and commander images have two layers. The background layer uses background tiles to fill in the greyscale elements, which in this example looks like this:

The foreground, meanwhile, is a sprite that's positioned over the top of the background. Sprites can have transparent pixels, and they also have their own palettes. In this example, the foreground sprite looks like this:

If we want to change the palette of the system image, say to this:

then all we have to do is change the palette that is applied to the foreground sprite:

We then draw our sprite over the top of the greyscale background, which always stays the same colour, as the colour of the background colours are defined by the view's attrribute table. Here are the view attributes for the Data on System screen, as defined by variable viewAttributes10, showing the colours available to each 2x2 block of tiles:
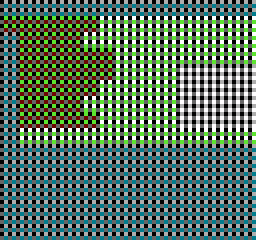
You can see the greyscale block on the right, which is where the system image goes.
The commander image is similar, except the image is split up into a background headshot and a colourful face. The headshot contains the backdrop, the clothing and some facial highlights, while the colourful face gets superimposed as a sprite. For example, this slightly scared-looking gentleman:

is made up of this background headshot image:

and this sprite-based face image:

In the commander's case the same palette is always used, and the only colour that changes is the backdrop, which gets set to blue when we're docked, or green, amber or red when we're in space (depending on how dangerous the situation is). However, there are various additional sprites that can be added, including left and right earrings and a medallion, which declare how rich we are, and dark glasses, which appear if our legal status is too far on the wrong side of the law. Here's the same pilot after he's made far too much money from trading in illegal goods:

System colours and commander ranks
----------------------------------
The colour and design of each system image is set using the system seeds. The system seeds are used to generate all the data for each system, as described in the deep dives on the galaxy and system seeds and generating system data. Not surprisingly, then, we use the same approach for choosing the system image.
System images are created by the GetSystemImage routine. This calls the GetSystemBack routine to choose the style of image and unpack the grey background into the pattern buffers. It then unpacks the foreground patterns directly into the PPU's VRAM, ready for the latter to be assigned to the relevant sprites.
The style of the image is chosen by EOR'ing the values of the s0_hi, s1_hi and s2_hi seeds, extracting the low nibble and reducing it to fit into the range 0 to 14. We then use this to pick an image from systemImage0 to systemImage14.
The foreground sprite of the system image always uses sprite palette 1. The colours in this palette are defined in the GetViewPalettes routine, which calculates a number between 0 and 7 by EOR'ing the s0_lo, s2_hi and s1_lo seeds for the current system, shifting the result right by two places and flipping bits 2 and 3.
The results can be seen in the following image, which shows every variation of every system image that you'll come across in-game:
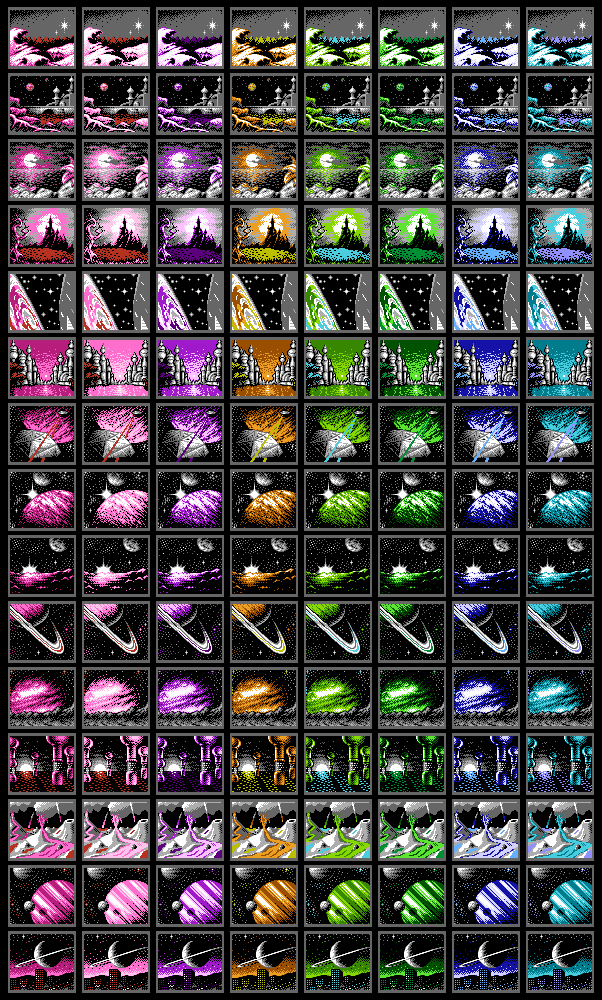
If you want to see what all the individual system images look like, check out the system images folder in the accompanying repository. You can also find Python scripts that implement the unpacking process and combine the results into image files.
Commander ranks
---------------
The commander images shown on the Status Mode screen are based on combat rank, cash level and legal status. The style of headshot is calculated in the GetHeadshotType routine, using a formula that gives the lower rank images more variation, specifically when it comes to reacting to danger.
It works like this. We take the current combat rank in TALLY(1 0) and reduce it to a value of 0 for Harmless to 8 for Elite (see the deep dive on combat rank for more about the TALLY variable). We then calculate another value based on the ship's condition, to give 0 for docked and green conditions, 1 for yellow and 2 for red. We then calculate following index value:
3 * rank + condition
This is used as an index into the headShotsByRank table to fetch the final commander image number to display, which is a value from 0 to 13 that corresponds to the faceImage0 to faceImage13 and headImage0 to headImage13 images.
The headShotsByRank is designed so that the ship's condition makes lower-rank commanders appear scared in dangerous conditions. In the following, the top row shows a Harmless commander reacting to danger, with the status condition going from green to yellow to red as we go from left to right. The middle row shows a Mostly Harmless pilot, while the bottom row is a commander with combat rank Poor:
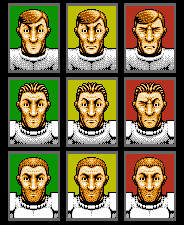
As you can see, by the time we get to Poor a yellow condition doesn't change our expression at all, and even a red condition only gets faintly pursed lips and slightly raised eyebrows. By the time we get to Average and above, danger doesn't faze our commander in any way at all.
On top of the commander face and headshot, the GetHeadshotType routine adds various bits of jewellery to our commander, depending on our cash levels and legal status. These are displayed using sprites, one for each embellishment, with the patterns coming from the packed image data at glassesImage. They are as follows:
- If we have more than 1,024.0 CR, we gain an earring in the left ear, courtesy of the DrawLeftEarring routine.
- If we have more than 2,022.4 CR, we also get an earring in the right ear, put there by the DrawRightEarring routine.
- If we have more than 1,002,700.8 CR, we also get a fancy medallion, via the DrawMedallion routine.
- If we are a fugitive (i.e. our legal status in FIST is 40 or more), we also get a cool pair of dark sunglasses from the DrawGlasses routine.
The results can be seen in the following image, which shows every variation of every commander image in the game. Lower ranks are at the top and higher ranks are lower down (specifically, image 0 is on the first row and image 13 is at the bottom). All the possible variations and embellishments for each rank are shown on the same row:
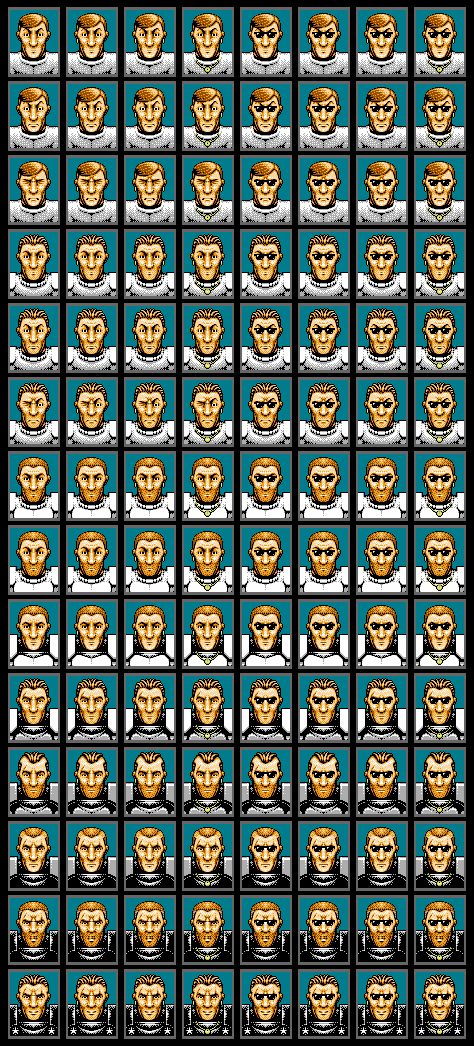
If you want to see what all the individual commander images look like, check out the commander images folder in the accompanying repository. You can also find Python scripts that implement the unpacking process and combine the results into image files.