How I converted BBC Micro Elite into a two-player game
Under the bonnet, BBC Micro Elite is a stubbornly single-player game. This makes perfect sense, as that's how the game was designed, but it does mean that it's a bit of a challenge for anyone wanting to coax a second player out of Bell and Braben's elegant code.
This article describes how I built two-player Elite. There's a lot to say, so I've split it up into a number of sections that cover the development process in the order in which I tackled it. You might like to read them from start to finish, but you can also click on them to jump down to the relevant section:
- An overview of how two-player Elite works
- A note on bit-based flags
- Splitting the space view
- Target calculations
- Cheating with the sun and planet
- Responsive controls for two players
- Miscellaneous
As with all my hacks, two-player Elite takes the original game's source code and modifies it; it is not a brand new game, it is a hack of the original. In the case of two-player Elite, the original game is the 6502 Second Processor version of Elite, with the flicker-free hack already applied. I then added all the various modifications required to add a second player on top of that base.
You can see all this in the project's GitHub repository. If you search the source code for "Mod:" then you will find every change that I've made to the original 6502 Second Processor version of Elite to get to two-player Elite. The changes are split between the parasite and I/O processor sources, as appropriate, and every change is documented to the same level of detail as the rest of the original game's source code (in other words, every single line is explained in detail).
I hope you enjoy reading about two-player Elite as much as I enjoyed hacking it into existence.
An overview of how two-player Elite works
-----------------------------------------
There's a clever conceit at the heart of 8-bit Elite that makes life considerably simpler for anyone working with the game code. It is this: the player is always at the centre of the universe.
For example, when the player moves forwards, they don't actually move at all; instead, everything else in the local bubble moves backwards. And when a player rolls to the right, they don't actually rotate; instead, everything in the local bubble rotates to the left around them. You can read all about this in the deep dive on rotating the universe, and it's key to understanding two-player Elite.
Always having the player at the origin makes certain aspects of the game code a lot simpler. For example, it's almost trivial to work out if an enemy ship is in the player's laser sights; we first check whether the enemy is in front of the player (i.e. z > 0 for the enemy's z-coordinate), and if it is, we check whether it is close enough to the z-axis to be within the enemy ship's targetable area (i.e. x^2 + y^2 < t for the enemy's x- and y-coordinates, with t being the targetable area from the enemy ship's blueprint). Because the z-axis points straight out of the front of the player's ship, out of the ship's nose and directly along the laser lines, we don't need to care about rotation or orientation, we just do some simple multiplication and the result is very accurate. You can read all about this in the deep dive on being in the crosshairs.
Unfortunately, this conceit makes it pretty difficult to add a second player to Elite. If the whole universe is centred on one player, then it can't also be centred on another player, so how do we address this?
One approach might be to run two separate instances of Elite, one for each ship, and have them talk to each other somehow; in essence, building a networked version of Elite, just within the same machine. This might work, but it would require a lot of memory and a lot of CPU power, and it would get pretty complicated pretty quickly.
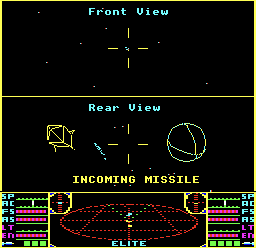
Instead, two-player Elite fully embraces the player-centric conceit at the heart of the original game, and effectively bolts a second player onto this tried and trusted game engine. Let's consider the in-game two-player Elite screen:
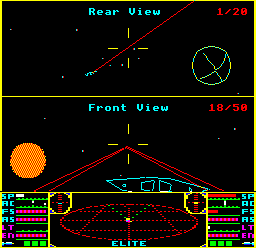
The local bubble is still centred on one player; let's call them player 1, with the top space view showing the view from player 1's cockpit. In a very real sense, the top view is completely standard Elite, just cropped into a smaller part of the screen. When player 1 rotates or accelerates, they don't move, but the whole local bubble moves around them instead; the top space view is normal Elite in pretty much every way that matters.
Player 2, then, is simply another ship that is spawned into player 1's local bubble. Player 2 isn't at the centre of the universe; instead, they are just like NPC ships in the original game, so when player 1 rotates or moves, the whole bubble - including player 2's ship and anything else in the vicinity (like the planet or sun) - rotates and moves in the opposite direction, just like all the non-player ships in the original.
The difference is that player 2's ship is not controlled by the game's tactics routine; instead, it is controlled by player 2's joystick and secondary flight keys on the keyboard. So when the human player 2 rotates the joystick or presses the "go faster" button, player 2's ship rotates or moves within player 1's local bubble. Player 2's ship doesn't rotate the universe around itself, it just moves in space as you would expect.
This isn't too much of a leap - after all, NPC ships in the original game work in this way, so moving NPC ships by joystick rather than by algorithm isn't too hard to imagine. Indeed, you can configure player 2 to be an AI Pilot in two-player Elite, in which case the code controlling player 2's ship just switches back to the original tactics routines rather than reading the joystick and keyboard.
So we have a model that is familiar, in that we have a player 1-centric universe that contains the planet, the sun, player 2's ship and up to two missiles. Player 1's space view is easy enough to draw, as player 2 is just another ship in the local bubble, so we can draw the top space view as normal (just with the required cropping).
This defines the main challenge of the two-player Elite hack: how do we draw all of this into the bottom space view, so that everything is correct from the point of view of player 2? This is where the complexity arrives, so I've split the answer up into a number of sections:
- We start by talking about how to draw player 1's view, as this gives us a chance to revisit how single-player Elite works. See the sections on the split space view and drawing player 1's space view for details.
- In order to draw player 2's view, we first create duplicates of the sun, planet, ships and missiles in the local bubble. This is described in the section on drawing player 2's space view.
- Once we've got our duplicates, we need to transform each of them from player 1's frame of reference (i.e. with player 1 at the origin and the axes aligned with player 1's ship) into player 2's frame of reference (i.e. with player 2 at the origin and the axes aligned with player 2's ship). This is the core part of two-player Elite, and is detailed in the sections on the geometry behind player 2's view and the arithmetic behind player 2's view.
- A pretty vital aspect of dogfighting in space is the ability to target and shoot your opponent. As discussed above, this is pretty easy for player 1, but it's a bit more involved for player 2, so this is explained in the section on target calculations
- Finally, all is not what it seems... of course. Accuracy and speed are constant challenges when working with floating point geometry on an 8-bit CPU, and I confess to using some smoke and mirrors to make things appear a bit more stable than they actually are. I talk about these in the section on cheating with the sun and planet.
There are also sections on some of the more straightforward aspects, such as the responsive control system, and to round it off there's a miscellaneous section for anything else worth talking about.
Let's start with a look at splitting the space view in two, which was the first task I tackled... but before we get stuck in, here's a quick note about the bit-based flags that I'm using in two-player Elite.
A note on bit-based flags
-------------------------
Two-player Elite contains a lot of new variables, and a lot of these are flags. For example, the split screen is controlled by this flag, which we look at in the next section:
- splitScreen controls the split-screen effect:
- Bit 7 set = draw the space view as a split screen
- Bit 7 clear = full screen
You'll notice that this variable uses bit 7 to store its state. This approach isn't that popular in Elite - Bell and Braben's code tends to prefer flags that are either zero or non-zero, and which can be tested with an LDA and BEQ combination. But for my own coding I've been more influenced by Geoff Crammond, who over the course of Aviator, Revs and The Sentinel, settled on using bit 7 as the flag (and possibly bit 6 as well). The advantage of using bit 7 is that we can test the state of the flag without using any registers, as the BIT instruction sets the N and V flags to bits 7 and 6 of its operand. So instead of testing whether our flag variable is non-zero, like this:
  LDA flagVariable      \ Set A to the value of the flag variable
  BNE flagIsSet         \ Jump to flagIsSet if A is non-zero
or zero, like this:
  LDA flagVariable      \ Set A to the value of the flag variable
  BEQ flagIsNotSet      \ Jump to flagIsNotSet if A is zero
we can do the following to test bit 7 being set, without needing to use a register:
  BIT flagVariable      \ Set the N flag to bit 7 of the flag variable
  BMI flagIsSet         \ Jump to flagIsSet if the N flag is set
or we can do this to test bit 7 being clear:
  BIT flagVariable      \ Set the N flag to bit 7 of the flag variable
  BPL flagIsNotSet      \ Jump to flagIsNotSet if the N flag is clear
Similarly, we can do the following to test whether bit 6 is set:
  BIT flagVariable      \ Set the V flag to bit 6 of the flag variable
  BVS flagIsSet         \ Jump to flagIsSet if the V flag is set
or this to test whether bit 6 is clear:
  BIT flagVariable      \ Set the V flag to bit 6 of the flag variable
  BVC flagIsNotSet      \ Jump to flagIsNotSet if the V flag is clear
Not only that, but we can set the flag in bit 7 without needing to use a register, like this:
  SEC                   \ Set the C flag
  ROR flagVariable      \ Rotate the C flag into bit 7 of the flag variable
and we can clear it in a similar fashion like this:
  CLC                   \ Clear the C flag
  ROR flagVariable      \ Rotate the C flag into bit 7 of the flag variable
or, if we're only using bit 7 of the flag variable and know that the other bits are clear (and in particular bit 6), we can do this:
ASL flagVariable \ Shift bit 6 (clear) into bit 7 of the flag variable
And because we are running the main game code on the 6502 Second Processor with the extra instructions of the 65C02 CPU, we can clear both flags in just one instruction, like this:
STZ flagVariable \ Clear bits 6 and 7 of the flag variable
You can also use these flag variables to store previous flag values by shifting right (so bit 6 inherits the previous value of bit 7, for example), but that's getting really deep into Geoff Crammond territory. For two-player Elite, I only use bits 6 and 7 as independent flags, so that's the kind of flag logic you'll see throughout the code modifications.
Splitting the space view
------------------------
Compared to some of the other challenges in two-player Elite, splitting the space view into two parts is relatively straightforward. There are two new variables that control the screen-splitting process, and they work like this:
- splitScreen controls the split-screen effect:
- Bit 7 set = draw the space view as a split screen
- Bit 7 clear = full screen
- drawPlayerView determines which player's view to draw in the split screen:
- Bit 7 set = draw player 1's view (top)
- Bit 7 clear = draw player 2's view (bottom)
Given these two flag variables, we can update any drawing calculations to draw into the correct half of the screen. We only need to make changes to the drawing routines for when bit 7 of splitScreen is set, in which case we need to update the y-coordinate of the pixel that we are drawing to point to the correct space view, according to the value of drawPlayerView.
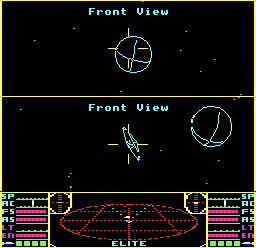
To make this a bit easier we can use the configuration variable Y from the original source, which is set to half the height of the space view (so for the BBC Micro, Y is set to 96 pixels, as the full space view is 192 pixels high); I will refer to this variable as #Y to avoid confusing it with the 6502's Y register. So each of the two space views in the following screenshot is #Y pixels tall, and the top of the dashboard is at y-coordinate #Y*2:
We can then calculate the following:
- If we are drawing player 1's view in the top part of the space view, then subtract #Y/2 from the y-coordinate. This moves the whole scene upwards so the centre of the view (at the laser sights) is in the middle of the top half. Then we check whether the pixel fits into the top half of the screen (i.e. into the range 0 <= y < #Y/2) and if it does, we plot it.
- If we are drawing player 2's view in the bottom part of the space view, then add #Y/2 to the y-coordinate. This moves the whole scene down so the centre of the view (at the laser sights) is in the middle of the bottom half. Then we check whether the pixel fits into the bottom half of the screen (i.e. into the range #Y/2 <= y < #Y) and if it does, we plot it.
This calculation occurs in a number of routine, all of which have been updated in two-player Elite to draw into either player 1's view or player 2's view, according to the value of drawPlayerView:
- PIXEL2 for drawing stardust
- LASLI for drawing the big, red laser lines at the bottom of the space view
- DOEXP for drawing explosions
- PLANET for drawing the planet
- SUN for drawing the sun
- SHPPT for drawing distant ships as dots
- SIGHT for drawing the laser crosshairs
- LL145 for line-clipping in circles and ships
The last routine is worth explaining a bit further, as the line-clipping routine at LL145 is applied to every line that's drawn as part of a ship wireframe or a circle, so it's used when drawing ships, planets, launch tunnels and so on. You can read all about how it works in the deep dive on line-clipping, but suffice to say it's fairly complicated and involves some relatively slow arithmetic.
For two-player Elite, we need to extend LL145 to cope with two scenarios:
- We still need the original, full-screen line-clipping routine for the launch tunnel, or in case we want to display full-screen ships on the title screen or circles on the chart screens (the charts are disabled in two-player Elite and the title screen actually clips to player 1's space view, but at least they could be easily reinstated if required).
- We need a new version that clips lines to either one of the two-player views, so we can draw ships and planets in just one half of the space view without them bleeding into the other.
I did briefly try reworking LL145 to cope with the split-screen player views, but it didn't go too well, so to avoid getting bogged down, I added a cheeky hack that worked so well I kept it. Here's how it works.
If the screen is normal and not split into two player views (i.e. when bit 7 of splitScreen is clear) then we run LL145 as normal. But if the screen is split then we use the following approach to move the line up the screen to be centred in player 1's space view, where we clip the line to the half-height view; and then, if we are drawing player 2's view, we move the clipped line down into the bottom half of the split screen. As the line's coordinates are 16-bit signed numbers that use the game's extended screen coordinates, we can move the line up the screen using normal SBC instructions, using the carry flag as the 6502 intended.
This is how the algorithm works:
- We start by subtracting #Y/2 from the line's two 16-bit y-coordinates to move the line up the screen by half the height of player 1's space view, so the line is now in the correct position for player 1 (though it hasn't been clipped yet).
- We now want to clip this newly positioned line to fit into player 1's space view, so that's the y-coordinate range 0 to #Y/2. The standard LL145 routine clips to the range 0 to #Y, so instead of just calling LL145 directly, we do the following:
- Double the line's 16-bit y-coordinates with a simple left-shift, which stretches the line in the y-axis to double its height on-screen. The top of the screen is the zero y-coordinate, so this is a bit like drawing our line on a stretchy sheet of rubber that's the same size as player 1's space view, and then gripping the sheet at the top and bottom and pulling the bottom down until the sheet is double height, i.e. the height of the full, two-player space view.
- We then run LL145 as normal, to clip the lines to 0 <= y < #Y and 0 <= x < 256. This clips our double-height line to the bounds of the full space view, so that's twice the height of the player 1 space view. If you like, this is clipping our line to the edges of the stretched sheet of rubber.
- Finally we halve the line's 16-bit y-coordinates with a simple right-shift, which is like us letting go of the bottom part of the rubber sheet, so it springs back to being the same shape as player 1's space view, but with the line clipped to the top half of the full, two-player space view.
- If we are drawing player 2's view (i.e. bit 7 of drawPlayerView is set), we finish off by adding #Y to the y-coordinates of the clipped line to move the whole clipped line down into the bottom half of the space view.
The overhead of this extra code is relatively minor, as it only requires addition, subtraction and shifting, and it leaves us with a line-clipping routine that works in both the original screen and the split screen without needing to change the original LL145 routine at all.
There are a few other areas where we need to cater for the split screen. In the original game, whenever we change the space view (front, rear, left, right) or switch to an information screen like the charts or status mode screen, then the TTX66 routine clears the whole top part of the screen, draws the yellow border and then displays the relevant information. This can't happen in two-player Elite, as otherwise one player changing views would affect the other player's view, so we need to extend TTX66 to cater for this; the easiest way is to add a couple of additional text control codes to the TT26 text-printing routine in the I/O processor, so control code 14 clears player 1's view and control code 15 clears player 2's view. This means we can clear each screen by simply printing the relevant control code, which gets interpreted by the I/O processor as a screen-clearing command.
Finally, we also need to update the in-flight messaging system to cater for messages in both player views. As there are a few variables used to store the current message details (so it can be easily erased), it's easier just to duplicate the MESS routine into Player2MESS, so MESS prints in-flight messages in player 1's view, and Player2MESS does the same for player 2. I ended up duplicating quite a few aspects of the game for player 2 in this way; see the miscellaneous section for more details.
Now that we have drawing routines that can cater for the two split-screen player views, let's talk about how we can draw the contents of each player's space view.
Drawing player 1's space view
-----------------------------
As discussed in the overview, the heart of two-player Elite is the exact same player-centric local bubble model as in the original single-player game, with player 1 at the centre of the universe. Drawing the top space view for player 1 is therefore fairly easy, at least in concept; we just draw the game screen as usual, showing everything from the perspective of player 1, and all we need to do is clip what we draw so it fits into the half-height space view at the top of the screen.
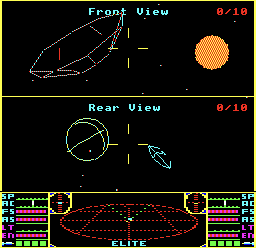
This makes it sound a lot easier than it is in practice, but the concept shouldn't be too difficult to grasp. Drawing player 2's space view, on the other hand, is considerably more challenging, and is covered in the next section, but for this section let's stick to player 1's view - the one showing a Thargoid and the sun in this screenshot:
Before describing how two-player Elite works, let's recap how single-player Elite stores its environment, and in particular the ships and other objects in the local bubble of universe that we want to draw in the space view. This is all described in detail in the deep dives on the local bubble of universe and ship data blocks, but here's a brief summary.
The game has a fixed number of ship slots, with 12 in the BBC Micro version and 20 in the 6502 Second Processor version (two-player Elite is based on the latter). Each object in the local bubble occupies one slot, with the planet in slot #0, either the sun or the space station in slot #1, and then all the various ships and missiles and asteroids in slots #2 and up.
Each slot is managed via the FRIN table, which contains one byte per slot; a zero entry indicates an empty slot, while a non-zero entry indicates either a ship, planet, sun or station (in which case FRIN contains the ship type). Each occupied slot also has an associated ship data block, which lives in the K% workspace, and one of those bits of data is the address of the ship's line heap, which is used to store the coordinates of the ship's on-screen wireframe lines, so the lines can quickly be redrawn using EOR logic to remove the ship from the screen.
All space coordinates in single-player Elite are relative to the player, who lives at the origin with coordinates (0, 0, 0). The z-axis goes into the screen, so that's pointing straight out of the nose of the player's ship, while the x-axis goes from left to right and the y-axis points up. (Note that the BBC Micro's screen y-coordinates go the other way and increase as you move down the screen, but we're talking about 3D space coordinates here, and they increase as you move up in space.)
Finally, note that in this context, "ship" is used to refer to anything with a slot, so that includes the sun, the planet, the station or non-ship objects like asteroids or cargo canisters. It's a lot easier to say "ship" than "ship, planet, sun, station etc." every time.
We keep this model for two-player Elite, but in a reduced manner. Because two-player Elite is a deep space dogfighting game, we don't come across any space stations, so slot #1 is always allocated to the sun. And we also strictly limit the number of objects to avoid slow-downs, with a maximum of one in-flight missile per player giving a limit of two in-flight missiles at any one time.
The ship slots in two-player Elite therefore look like this, with player 1 at the centre of the universe:
- Slot #0 = Planet
- Slot #1 = Sun
- Slot #2 = Player 2's ship
- Slot #3 = Missile 1
- Slot #4 = Missile 2
That's it - that's the local bubble of universe for two-player Elite. We may have anything from 0 to 2 missiles spawned, but we always have the planet, the sun and player 2's ship.
This bubble works nicely for drawing player 1's space view, as all the space coordinates are relative to player 1 at the origin, just as in the original single-player game. But how do we take this bubble structure and use it to draw player 2's space view?
That's a simple question with a complicated answer, so first let's look at how player 1's view is drawn and see if that helps. The details can be found in the deep dive on program flow of the main game loop, but to save you wading through all that, let's concentrate on the ship-processing code at the heart of the game loop.
Every iteration of the main loop, the game works through each of the ship slots, one slot at a time, and it applies movement and rotation to the ship we are processing (the "current ship"). This movement is affected not only by how the player is moving in space, but also by the current ship's own rotation, speed and acceleration. Tactics are also applied at this point, so pirates will attack and traders will mind their own business, for example. Once the current ship has been updated, then the new data is stored in the ship's data block, and the ship is redrawn on-screen. This latter step is done in two parts, first by redrawing the existing on-screen lines using EOR logic and the coordinates in the ship line heap, and then by drawing the new lines on-screen (again using EOR logic to merge with the existing screen contents) and storing the new coordinates in the ship line heap.
This ship-drawing loop manages the ships, the sun and the planet in the space view in single-player Elite, with the actual drawing being done by the LL9 routine. This is called in part 12 of the main flight loop, and it caters for the planet, the sun and the ships, so LL9 ends up being called once for each populated ship slot. Once we've finished going through the ship slots, the game calls the STARS routine to update the stardust, and that's how the space view is drawn in single-player Elite.
For two-player Elite, then, we can use the same loop for drawing player 1's space view, with LL9 and STARS taking care of the ships and the stardust. We just need a similar system for drawing player 2's view, ideally without adding too much overhead.
Let's take a look at that next.
Drawing player 2's space view
-----------------------------
The core approach in two-player Elite is to treat ship slots #0 to #4 as the single source of truth for the local bubble, and to draw that same bubble from the perspective of player 2 in player 2's space view. To keep the flight loop as unchanged as possible, we add a new routine, DrawPlayer2View, which we call for each ship slot, just after LL9 has drawn that ship in player 1's space view.
DrawPlayer2View, as its name suggests, draws the current ship, but it does it in player 2's view and from the point of view of player 2. DrawPlayer2View is the core of two-player Elite, and you can see it in the raw source by searching for ".DrawPlayer2View".
To simplify things a bit, you can think of DrawPlayer2View as a large, six-part wrapper around yet another call to LL9 to draw the current ship, but before drawing the ship, we convert the current ship's data block from the default perspective (i.e. the view from player 1's ship) into a different frame of reference (i.e. the view from player 2's ship). The call to LL9 then draws the current ship into player 2's space view without us needing to make any changes to LL9 itself.
DrawPlayer2View is split into six parts:
- Part 1 processes byte #31 of the ship data block, as this contains data that isn't necessarily the same for each ship in the two different player views. For example, a ship might be visible in one view but not visible in another, and as that information is stored in bit 3 of byte #31, we need to manage this data byte differently for each ship in each view.
- Part 2 applies special rules to the planet and sun when they are on-screen, as described in the section on cheating with the sun and planet.
- Part 3 is the most important part of two-player Elite, as it calculates the current ship's coordinates and orientation in player 2's frame of reference, so it can be drawn in player 2's space view. We'll talk about this in the remainder of this section, and we'll explore the maths in the sections on the geometry behind player 2's view and the arithmetic behind player 2's view.
- Part 4 is nice and short, but it's important, as it draws the current ship in player 2's space view. It starts by setting bit 7 of drawPlayerView to ensure the ship is drawn in player 2's view. It then calls PLUT to switch to the correct directional view - front, rear, left or right - just as we do in single-player Elite (see the deep dive on flipping axes between space views for details). And finally it calls LL9 to draw the current ship in player 2's view.
- Part 5 deals with lasers and targeting, as described in the section on target calculations.
- Part 6 returns to the ship data to the state it was in when we called DrawPlayer2View, so the main loop can continue on as if nothing has happened.
This approach makes sense until we need to draw the ship in slot #2. Slot #2 contains player 2's ship, but player 2 can't see their own ship, so there's nothing to draw. So when we are processing the current ship in slot #2, DrawPlayer2View instead draws player 1's ship from the perspective of player 2, as player 1's ship doesn't actually have a ship slot (because in the local bubble, player 1 is always at the origin and is always aligned with the axes, so we don't need to store its coordinates, orientation and so on). As a bonus, the maths we need to do when working out where player 1's ship appears in player 2's space view is a simplified version of the maths we need to do for the other slots; see the section on the geometry behind player 2's view for more on this.
For the rest of this section, let's examine part 3 of DrawPlayer2View in more detail, as this is where the magic lives. By this point we are processing the current ship and have drawn it in player 1's view. As a reminder, the slots are set up as follows:
- Slot #0 = Planet
- Slot #1 = Sun
- Slot #2 = Player 2's ship
- Slot #3 = Missile 1
- Slot #4 = Missile 2
So given the ship data for the current ship, we now we need to draw the ship from the perspective of player 2, and in player 2's space view.
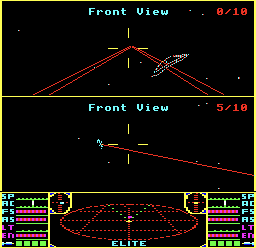
If you look at the ship data for a typical ship, it's mostly coordinates and orientation vectors; see the deep dive on ship data blocks for details. The coordinates are the (x, y, z) space coordinates of the ship relative to player 1, while the orientation vectors define the direction in which the ship is pointing, stored as three vectors - nosev, roofv and sidev - that point out of the nose, roof and right side of the ship respectively. These vectors are said to be orthonormal, which just means that the vectors are orthogonal (i.e. they are perpendicular to each other), and normal (i.e. each of the vectors has length 1). See the deep dives on orientation vectors and tidying orthonormal vectors for more information on these vectors.
So out of 37 bytes in each ship data block, the first 27 bytes define the ship's position and orientation in space, all of them from the perspective of player 1. As player 1 and player 2 can't be at the same point in space, we know that these 27 bytes will be different for this ship when viewed from the perspective of player 2.
We'll look at exactly how they differ in the next section, but in terms of DrawPlayer2View, our first step is to make a copy of the ship data for the ship we are trying to draw, because we're going to have to change most of it when drawing that ship in player 2's view. To make things simple, we can duplicate the current ship's data from slot #n into slot #n+10, like this:
- Slot #10 = Planet from player 2's perspective
- Slot #11 = Sun from player 2's perspective
- Slot #12 = Player 1's ship from player 2's perspective
- Slot #13 = Missile 1 from player 2's perspective
- Slot #14 = Missile 2 from player 2's perspective
So, for example, when we are processing slot #1 in the main game loop, which contains the sun, DrawPlayer2View copies the sun's ship data into slot #11; similarly, player 2's ship gets copied into slot #12 for processing in DrawPlayer2View, and so on. This duplication process means we can apply our transformation maths to the copy of the current ship's data to convert it into the coordinates and orientation for player 2's view, and we can simply pass this higher slot number to LL9 to draw the ship, and it will all just work. Skip to the section on the geometry behind player 2's view to read about this transformation process, as it deserves a section all of its own.
The ship data in the higher slot number does get used once more after the ship has been drawn, but it isn't until the next time the main loop processes this slot, when we need to update the ship in player 2's view. Before the higher slot ship data is overwritten, part 1 of DrawPlayer2View uses it to remove the ship from player 2's scanner (i.e. the yellow ship stick), as redrawing the ship stick in its current position with EOR logic will remove it. Then we can copy the lower slot number data into the higher slot number again, overwriting what's there, and the whole process starts again.
There are some important caveats in this copying process. As mentioned above, byte #31 of the ship's data block contains a number of flags that don't make sense when blindly applied to player 2's perspective, so instead we store byte #31 separately for slots #2 to #4 (these are stored in the three bytes at player1INWK31). Part 1 of DrawPlayer2View therefore starts by looking at byte #31 for the current ship; by this point the current ship's data is in the zero page INWK workspace, so DrawPlayer2View checks the flags in INWK+31 and copies any relevant ones into the corresponding byte in player1INWK31.
For example, if a missile has just exploded then bit 7 of INWK+31 will be set, so we will want to copy that over into player1INWK31 so the missile explodes in player 2's view as well as in player 1's view; but if a ship is visible in player 1's space view then that has no bearing on whether it will also be visible in player 2's space view, so we don't want to copy over bit 3 of INWK+31 (which records this fact). Instead we use bit 3 from player1INWK31 to keep track of whether a ship is on-screen in player 2's view.
The other important difference in ship data between the lower-numbered and higher-numbered slots is the address of the ship line heap. The ship line heap is very simple - it contains sets of four coordinates, each of which describes a line in that ship's on-screen depiction. To draw the ship we simply work through the heap, drawing each line, and to remove the ship from the screen, we repeat the process using EOR logic. You can read all about this in the deep dive on drawing ships.
Obviously, the same ship will look completely different in player 1's view compared to player 2's view, so we need to maintain separate ship line heaps for the lower-numbered slots and the higher-numbered slots. To this end, when we duplicate the ship data for a lower-numbered slot into a higher-numbered slot, then as we do the duplication, we subtract &2000 from the ship line heap address in bytes #33 and #34 of the ship data block. The 6502 Second Processor version of Elite has quite a generous memory allocation to the ship heap, as you can see in the 6502 Second Processor Elite memory map; the heap stretches downwards from &D000 to &84E4, so that's &4BCC bytes. We're only using the top part of the ship heap for player 1's ship and two missiles (as the planet and sun have their own line heaps), so the maximum heap size required is 157 bytes for the player ship (based on the Cobra Mk III, which has the largest requirement), plus 85 bytes for each missile, giving a total of 327 bytes, or &147. Spacing out the two views' ship heaps by &2000 bytes is therefore complete overkill, but it's better to be safe than sorry.
The planet has its own ball line heaps at LSX2 and LSY2 that are populated by the BLINE routine (see the deep dive on the ball line heap for details). In order to support two different space views with two different-looking planets, we therefore need to allocate memory to a second pair of line heaps for the planet in player 2's view, which we can call LSX2a and LSY2a. We can then reuse a method that I first used in the anaglyph routines in Elite 3D to support different right-eye and left-eye views. To get BLINE to work with the correct ball line heap, we can recode the routine to look up all heap-related addresses from vectors, which get set by the SetPlayerBallLine routine, depending on the current value of drawPlayerView. Specifically, the LSX2S(1 0) vector points to either LSX2 or LSX2a, the LSY2S(1 0) vector points to either LSY2 or LSY2a, and the LSPS(1 0) vector points to either LSP or LSPa, so we can use the same BLINE routine to draw the ball line for each of the player views individually, while storing the results in the correct ball line heap.
The sun also has its own line heap, but this time we don't need to do any duplication, as the sun stores its lines as one byte for each of the 192 raster lines in the space view. We can therefore simply use the first half of the existing heap for the top space view and the second half for the bottom space view, and the only bit we need to duplicate is the centre of the sun's x-coordinate in SUNX, as that can obviously be different for the sun in each of the two views. Again, we use a vector approach, so the LSOS(1 0) vector points to either LSO or LSOa, and the SUNXS(1 0) vector points to SUNX or SUNXa. This gets set in SetPlayerSunHeap, again according to the current value of drawPlayerView.
The final piece of the duplication puzzle is the stardust, which is drawn at the end of the main flight loop, after all of the ship slots have been iterated through and drawn. The STARS routine is responsible for drawing stardust, as described in the deep dives stardust in the front view and stardust in the side views. Stardust coordinates are stored in six different heaps, with one byte in each heap for each particle of stardust, storing the 16-bit x-coordinate in (SXL SX), the 16-bit y-coordinate in (SYL SY) and the 16-bit z-coordinate in (SZL SZ). Because the two space views in two-player Elite are half the size of the space view in single-player Elite, we can split the existing stardust particles between the two views, with player 1's stardust coordinates in the first half of each heap, and player 2's stardust in the second half.
The only fiddly bit is that stardust moves according to the player's movement, and in particular the alpha (roll), beta (pitch) and delta (speed) values, and it would be a bit of a pain to recode all the star-moving routines to cater for the different values for player 1 and player 2. So instead we use three new routines to apply another slightly hacky workaround:
- SaveShipMovement saves player 1's movement variables into a cache.
- GetPlayer2Movement copies player 2's movement data into the various ALPHA, BETA and DELTA variables that are used in the stardust calculations.
- LoadShipMovement restores player 1's movement variables from the cache.
We can then insert a shim into the start of the STARS routine to do the following:
- Call SaveShipMovement to store player 1's movement data.
- Call GetPlayer2Movement to fetch player 2's movement data.
- Move and draw player 2's stardust in player 2's view, using the second half of each stardust heap.
- Call LoadShipMovement to revert to player 1's movement variables.
- Move and draw player 1's stardust in player 1's view, using the first half of each stardust heap.
And that's how we draw player 2's view... except we haven't talked about the maths behind all of this, and that's the most important part of all, so let's do that now.
The geometry behind player 2's view
-----------------------------------
As explained above, the local bubble in two-player Elite is essentially a single-player bubble, just like the original game, with player 1 at the centre of the universe. Player 2 is just another ship in the bubble, in slot #2, and when we draw player 1's space view, we effectively use the same code as in the original game, we just crop it to the top half of the screen.
The challenge is to draw the same ships, but in player 2's space view and from player 2's perspective. The previous section explains how we duplicate the current ship into a higher-numbered slot, where we transform the ship's coordinates and orientation into player 2's perspective, and then we draw the results in the bottom space view.
In this section we look at that transformation process, which is the most important part of the entire hack. In order to follow along, you'll probably want to read the deep dive on orientation vectors, as we're going to be working with them a lot. Also, the core mathematical concepts are similar to those discussed in the deep dives on back-face culling and calculating vertex coordinates, particularly the bit about "scalar projection" in the first article and "transposing the rotation matrix" in the second, so you might find those useful too. I'll try to explain things as I go along, but sometimes it helps to have more than one explanation of a concept to hand.
Now that I've failed to put you off, let's try a thought experiment. Imagine you are playing two-player Elite in virtual reality, and you are currently sitting in player 1's ship. Out there in the distance you can just about see player 2's ship, and also in the same local bubble of universe are the planet, the sun and a missile or two. And imagine you can move your point of view to anywhere in this universe by pinching, grabbing and rotating, or whatever it is that the cool VR kids do these days.
The question is this: starting out with us sitting in player 1's cockpit, what do we need to do in order to see the view from player 2's cockpit? In other words, rather than moving ourselves, how do we grab and rotate the virtual universe around us in order to get to player 2's view? If we can answer this, then that's what we need to build into two-player Elite to let us calculate what the bubble looks like from player 2's point of view.
Intuitively, this is what I would do to answer this question. I'd drag the universe whole towards me, pulling player 2 closer and closer until my view was inside their cockpit, and then I'd rotate the whole lot around me until I was looking out of the ship's front view. This dragging and rotating process doesn't only move player 2's ship towards us and into the right position, but it also moves and rotates everything else in the bubble, including our original ship, i.e. player 1's ship.
In other words, we have just worked out a geometric transformation that we can apply to each ship in the bubble that will move that ship into the correct position and orientation for the view from player 2's ship. The first part (the dragging) is known as a "translation", and the second part is a rotation, so we now have a two-part translate-and-rotate transformation that takes ships from the coordinates and orientation they have when we are looking out of player 1's ship, and moves them to the coordinates and orientation they have when we are looking out of player 2's ship.
The next step is to convert this translate-and-rotate transformation into a mathematical process. We can then apply that process to the current ship in the main flight loop, and can draw the result in player 2's view. As a reminder, the transformation process is this:
- Apply a translation that moves player 2's ship to our position (so this is us dragging to the position of player 2's ship to our original position in player 1's ship).
- Apply a rotation that takes our current view direction (which was down the nose of player 1's ship) and spins the view around us until we are looking down the nose of player 2's ship.
We need to apply this two-part transformation to both bits of data that define the position and orientation of the current ship, so we need to apply it to the current ship's coordinates in space, to move the ship to the correct position relative to player 2's view, and we need to apply it to the ship's orientation vectors, to rotate the ship to the correct orientation relative to player 2's view. In the latter case, applying a translation to an orientation vector doesn't affect the orientation, so we only need to do the second step when transforming the current ship's orientation.
Now that we know what we need to do, let's look at how we can implement this transformation mathematically. We'll look at implementing the problem in two different ways: first, by considering Elite's orientation vectors, and second by looking at rotation matrices. These two approaches are mathematically the same, they just use different terminology to explain the same algorithm, so hopefully at least one of them will help clarify this relatively complicated process.
In terms of orientation vectors
-------------------------------
The first operation is reasonably simple. We start out with player 1 at the origin (0, 0, 0), which is at the centre of the universe, and with player 2's ship at the coordinates defined in the ship data block for slot #2 - let's call those coordinates (x2, y2, z2). We therefore need to apply a translation that moves player 2's ship from (x2, y2, z2) to player 1's ship at (0, 0, 0). This is easy enough; we need to apply a translation of (-x2, -y2, -x2).
Another way of thinking of this translation is that when we drag the universe towards us in the first part of our virtual reality thought experiment, we pull everything along the vector that joins player 1 and player 2, and we pull it all in the direction from player 2 to player 1. The vector from player 1 to player 2 is [ x2 y2 z2 ], so this means the vector from player 2 to player 1 is the reverse of that, which is [ -x2 -y2 -x2 ].
So this is our translation step, which we apply to the current ship. If the current ship's coordinates are at (x, y, z), then this is the translation:
  [ x ]    [ x ]   [ x2 ]
  [ y ] -> [ y ] - [ y2 ]
  [ z ]    [ z ]   [ z2 ]
The second operation in our transformation is the rotation, which is a bit more complicated. We need to apply a rotation that starts with us looking along player 1's viewing direction and spins things around until we are looking along player 2's viewing direction.
This is where the orientation vectors come in. Player 2's orientation vectors describe the direction in which player 2 is pointing relative to player 1, with nosev pointing out of player 2's nose, roofv pointing out of player 2's roof, and sidev pointing out of player 2's right side. These orientation vectors are orthonormal, so they are all unit vectors of length one, and this means we can use the same "scalar projection" approach as we do for back-face culling (see the deep dive on back-face culling for details).
As a reminder, scalar projection is the following property: given a vector and a unit vector, we can calculate the projection of the vector onto the unit vector by simply calculating the dot product of the two vectors. If we do this with a vector and three unit vectors, then the dot product gives us that vector, but expressed in terms of the three unit vectors - in other words, this is how we convert coordinates from one set of axes to another. This is the same as converting a vector from one perspective to another, or one frame of reference to another, which is what we need to do when drawing player 2's view. It's also worth remembering that coordinates and vectors are effectively the same thing; a coordinate is simply a vector with one end at the origin.
In this case, then, we want to take the following four vectors, which between them define the position and orientation of the current ship, just after we have applied the first step of our transformation:
- The updated coordinate of the current ship from above, as a vector
- The side orientation vector of the current ship
- The roof orientation vector of the current ship
- The nose orientation vector of the current ship
We want to apply the second step of our two-step transformation to each of these vectors by using scalar projection to project them onto player 2's orientation vectors, which moves them into player 2's frame of reference. So if [ x y z ] represents one of the vectors above, and player 2's orientation vectors are given by side2v, roof2v and nose2v, then we can apply the second step of our transformation by applying the dot product as follows:
  x -> [ side2v_x side2v_y side2v_z ] . [ x y z ]

  y -> [ roof2v_x roof2v_y roof2v_z ] . [ x y z ]

  z -> [ nose2v_x nose2v_y nose2v_z ] . [ x y z ]
We apply the dot products in this order because when we are sitting in a ship, the x-axis points out of the right side of the ship, the y-axis points up and out of the roof of the ship, and the z-axis points forwards and out of the nose of the ship. So projecting the [ x y z ] vector onto each of player 2's orientation vectors will project the vector onto the axes that we use when we are sitting inside player 2's ship. And that is what changes the perspective of each vector to that of player 2's pilot, which is what we want in order to draw player 2's view.
If we combine both steps of the transformation - i.e. the translation and the rotation - then we get the following result when we apply it to the current ship's coordinate in (x, y, z):
  x -> [ side2v_x side2v_y side2v_z ] . ( [ x y z ] - [ x2 y2 z2 ] )

  y -> [ roof2v_x roof2v_y roof2v_z ] . ( [ x y z ] - [ x2 y2 z2 ] )

  z -> [ nose2v_x nose2v_y nose2v_z ] . ( [ x y z ] - [ x2 y2 z2 ] )
And we get the following result when we apply the transformation to the orientation vectors for the current ship, because the translation step can be dropped (as it doesn't affect orientation):
  sidev_x -> [ side2v_x side2v_y side2v_z ] . [ sidev_x sidev_y sidev_z ]
  sidev_y -> [ roof2v_x roof2v_y roof2v_z ] . [ sidev_x sidev_y sidev_z ]
  sidev_z -> [ nose2v_x nose2v_y nose2v_z ] . [ sidev_x sidev_y sidev_z ]

  roofv_x -> [ side2v_x side2v_y side2v_z ] . [ roofv_x roofv_y roofv_z ]
  roofv_y -> [ roof2v_x roof2v_y roof2v_z ] . [ roofv_x roofv_y roofv_z ]
  roofv_z -> [ nose2v_x nose2v_y nose2v_z ] . [ roofv_x roofv_y roofv_z ]

  nosev_x -> [ side2v_x side2v_y side2v_z ] . [ nosev_x nosev_y nosev_z ]
  nosev_y -> [ roof2v_x roof2v_y roof2v_z ] . [ nosev_x nosev_y nosev_z ]
  nosev_z -> [ nose2v_x nose2v_y nose2v_z ] . [ nosev_x nosev_y nosev_z ]
These are the calculations that are implemented in part 3 of DrawPlayer2View, with the latter calculation being done in the OrientateMissile routine. They enable us to take an arbitrary ship's position and orientation within player 1's space view, and they give us the position and orientation of that ship within player 2's view. This, therefore, is the heart of two-player Elite.
There is one more part to the story, because we can simplify this calculation considerably when transforming player 2's ship. As mentioned above, slot #2 contains player 2's ship, but if we took player 2's ship and transformed it into player 2's view, then it would simply move to the origin and we wouldn't need to draw it. This is intuitive, but it also falls out of the maths fairly easily: if we applied the translation step to player 2's ship at (x2, y2, z2), then the result would be (0, 0, 0).
So instead of transforming player 2's ship into player 2's view, we instead we repurpose this ship slot (which we duplicate into slot #12) for drawing player 1's ship in player 2's view.
We can work out where player 1's ship ends up within player 2's view using the same process: by applying the above transformation to player 1's ship. Of course, player 1's ship doesn't have a slot, because in the game's bubble of universe, player 1's ship is always at the origin (i.e. the centre of the universe), and it always has the three axes as its orientation vectors (the z-axis is always pointing out of the nose of player 1's ship, for example). So when we work out player 1's position and orientation in player 2's view by applying the above transformation to player 1's coordinates and orientation vectors, we end up applying the transformation to the coordinates of player 1 at (0, 0, 0), and to the three axis unit vectors (as they match player 1's orientation).
We can therefore simplify the calculation quite a bit for this specific case. For the first calculation, we get the following simplification because the current ship's coordinate is (0, 0, 0):
  x -> [ side2v_x side2v_y side2v_z ] . ( [ 0 0 0 ] - [ x2 y2 z2 ] )

  y -> [ roof2v_x roof2v_y roof2v_z ] . ( [ 0 0 0 ] - [ x2 y2 z2 ] )

  z -> [ nose2v_x nose2v_y nose2v_z ] . ( [ 0 0 0 ] - [ x2 y2 z2 ] )
which gives us:
  x -> [ side2v_x side2v_y side2v_z ] . [ -x2 -y2 -z2 ]

  y -> [ roof2v_x roof2v_y roof2v_z ] . [ -x2 -y2 -z2 ]

  z -> [ nose2v_x nose2v_y nose2v_z ] . [ -x2 -y2 -z2 ]
And for the second calculation we get the following simplification, because the current ship's orientation vectors in sidev, roofv and nosev are the unit vectors:
  sidev_x -> [ side2v_x side2v_y side2v_z ] . [ 1 0 0 ]
  sidev_y -> [ roof2v_x roof2v_y roof2v_z ] . [ 1 0 0 ]
  sidev_z -> [ nose2v_x nose2v_y nose2v_z ] . [ 1 0 0 ]

  roofv_x -> [ side2v_x side2v_y side2v_z ] . [ 0 1 0 ]
  roofv_y -> [ roof2v_x roof2v_y roof2v_z ] . [ 0 1 0 ]
  roofv_z -> [ nose2v_x nose2v_y nose2v_z ] . [ 0 1 0 ]

  nosev_x -> [ side2v_x side2v_y side2v_z ] . [ 0 0 1 ]
  nosev_y -> [ roof2v_x roof2v_y roof2v_z ] . [ 0 0 1 ]
  nosev_z -> [ nose2v_x nose2v_y nose2v_z ] . [ 0 0 1 ]
which gives us:
  sidev_x -> side2v_x
  sidev_y -> roof2v_x
  sidev_z -> nose2v_x

  roofv_x -> side2v_y
  roofv_y -> roof2v_y
  roofv_z -> nose2v_y

  nosev_x -> side2v_z
  nosev_y -> roof2v_z
  nosev_z -> nose2v_z
So when we are processing slot #2, we can apply the exact same transformation process to player 1's ship by using these simplified calculations, which saves us a fair bit of time when calculating the position and orientation of player 1's ship within player 2's view.
That's how we can work things out using orientation vectors, but we can look at the same calculation in a slightly different way, using rotation matrices. So let's do that now.
In terms of rotation matrices
-----------------------------
Instead of all this talk of orientation vectors, we can analyse the rotation aspect of our two-part transformation by using rotation matrices, which is probably a more common way of thinking about rotation and orientation. Elite's code tends to make more sense if you work with the individual orientation vectors, but if you combine all three vectors into a 3x3 matrix, they form a special kind of matrix called a "rotation matrix", which can be applied to vectors to rotate them in space; see the Wikipedia entry on rotation matrices for more details.
Using the orientation vector names from the previous section, we can say that the current ship's rotation matrix looks like this:
  [ sidev_x sidev_y sidev_z ]
  [ roofv_x roofv_y roofv_z ]
  [ nosev_x nosev_y nosev_z ]
and player 2's rotation matrix looks like this:
  [ side2v_x side2v_y side2v_z ]
  [ roof2v_x roof2v_y roof2v_z ]
  [ nose2v_x nose2v_y nose2v_z ]
In terms of rotation matrices, the rotation aspect of our transformation can be expressed as a multiplication by the transpose of player 2's rotation matrix. The transpose "reflects" the shape of the matrix in a "mirror line" along the diagonal from top-left to bottom-right, so it looks like this:
  [ side2v_x roof2v_x nose2v_x ]
  [ side2v_y roof2v_y nose2v_y ]
  [ side2v_z roof2v_z nose2v_z ]
Given these two matrices, the rotation aspect of our transformation looks like this when expressed in terms of rotation matrix multiplication:
  [ sidev_x sidev_y sidev_z ]   [ side2v_x roof2v_x nose2v_x ]
  [ roofv_x roofv_y roofv_z ] . [ side2v_y roof2v_y nose2v_y ]
  [ nosev_x nosev_y nosev_z ]   [ side2v_z roof2v_z nose2v_z ]
The result of this multiplication is the new rotation matrix for the current ship, in player 2's frame of reference. In other words, the multiplication above is a rotation matrix representation of the transformation that we applied to the orientation vectors in the previous section, i.e. this one:
  sidev_x -> [ side2v_x side2v_y side2v_z ] . [ sidev_x sidev_y sidev_z ]
  sidev_y -> [ roof2v_x roof2v_y roof2v_z ] . [ sidev_x sidev_y sidev_z ]
  sidev_z -> [ nose2v_x nose2v_y nose2v_z ] . [ sidev_x sidev_y sidev_z ]

  roofv_x -> [ side2v_x side2v_y side2v_z ] . [ roofv_x roofv_y roofv_z ]
  roofv_y -> [ roof2v_x roof2v_y roof2v_z ] . [ roofv_x roofv_y roofv_z ]
  roofv_z -> [ nose2v_x nose2v_y nose2v_z ] . [ roofv_x roofv_y roofv_z ]

  nosev_x -> [ side2v_x side2v_y side2v_z ] . [ nosev_x nosev_y nosev_z ]
  nosev_y -> [ roof2v_x roof2v_y roof2v_z ] . [ nosev_x nosev_y nosev_z ]
  nosev_z -> [ nose2v_x nose2v_y nose2v_z ] . [ nosev_x nosev_y nosev_z ]
It's worth taking a deeper look at what this multiplication of rotation matrices represents. When you multiply two rotation matrices, each of which represents a rotation, then the result is a rotation matrix that represents the combined rotation of those two matrices. So our calculation, which looks like this:
  [ sidev_x sidev_y sidev_z ]   [ side2v_x roof2v_x nose2v_x ]
  [ roofv_x roofv_y roofv_z ] . [ side2v_y roof2v_y nose2v_y ]
  [ nosev_x nosev_y nosev_z ]   [ side2v_z roof2v_z nose2v_z ]
represents the combination of the current ship's rotation matrix (on the left) and the transpose of player 2's rotation matrix (on the right).
The current ship's rotation matrix represents the orientation of the current ship. You can think of it as a rotation, like this. If we're sitting at the origin as player 1, staring down the z-axis in the standard Elite setup, and instead we want to look in the same direction as the current ship that's out there somewhere in the bubble, then we can turn our head until it is pointing in the same direction as that ship (ignoring any physical constraints on our neck muscles). This is the rotation that's encapsulated in the current ship's rotation matrix - it's the head rotation that we would have to do in order to look in the same direction as the current ship.
The transpose of player 2's rotation matrix is slightly harder to visualise. Player 2's rotation matrix is orthonormal (i.e. normal and orthogonal) and a property of orthogonal matrices is that the transpose of the matrix is the inverse (i.e. the reverse) of the rotation. As we just discussed, a ship's rotation matrix represents how we would have to turn our head in order to align our viewpoint with that of the other ship, so if we apply this concept to player 2's ship, we see that player 2's rotation matrix represents our head rotation when moving from player 1's point of view (along the z-axis) to align with player 2's point of view.
The transpose of player 2's rotation matrix represents this rotation in the opposite direction. So applying the transpose rotation is the same as rotating the universe around us in the opposite direction, so instead of us turning our head to align with player 2's view, we rotate the entire universe in the opposite direction until we are aligned with player 2's point of view. And mathematically, applying the transpose rotation is done by multiplying by the transpose of player 2's rotation matrix.
This fits with our virtual reality thought experiment in the previous section. When we have pulled the universe towards us and we are in player 2's ship, we then rotate the universe around us to look through player 2's view. Mathematically, this is the same as multiplying each ship's orientation in the bubble by the transpose of player 2's rotation matrix. So this is exactly what our rotation matrix multiplication is doing; it's the same maths as the orientation vector calculation, it's just expressed differently.
The easiest place to see this in operation is in the simplified calculation for player 1's ship, where the current ship's rotation matrix (i.e. the first matrix in the calculation above) is the identity matrix, as player 1 is aligned with the axes. So in this simplified case, we rotate the ship by applying this rotation matrix:
  [ 1 0 0 ]   [ side2v_x roof2v_x nose2v_x ]   [ side2v_x roof2v_x nose2v_x ]
  [ 0 1 0 ] . [ side2v_y roof2v_y nose2v_y ] = [ side2v_y roof2v_y nose2v_y ]
  [ 0 0 1 ]   [ side2v_z roof2v_z nose2v_z ]   [ side2v_z roof2v_z nose2v_z ]
In other words, in this simplified case, we just set player 1's orientation to the transpose of player 2's rotation matrix. In terms of the calculation, this gives us exactly the same result as in the previous section, when we were rotating the orientation vectors:
  sidev_x -> side2v_x
  sidev_y -> roof2v_x
  sidev_z -> nose2v_x

  roofv_x -> side2v_y
  roofv_y -> roof2v_y
  roofv_z -> nose2v_y

  nosev_x -> side2v_z
  nosev_y -> roof2v_z
  nosev_z -> nose2v_z
This makes intuitive sense, as player 1's orientation within player 2's view will have the inverse orientation to player 2's orientation within player 1's view. And that inverse relationship is represented by transposing the rotation matrix.
In summary, the transpose matrix rotates us into player 2's frame of reference, and we apply this to the current ship's rotation matrix by multiplication, giving us the same rotation step as before, but in terms of rotation matrices rather than orientation vectors:
  [ sidev_x sidev_y sidev_z ]   [ side2v_x roof2v_x nose2v_x ]
  [ roofv_x roofv_y roofv_z ] . [ side2v_y roof2v_y nose2v_y ]
  [ nosev_x nosev_y nosev_z ]   [ side2v_z roof2v_z nose2v_z ]
In both of these calculations, the dot product is at the heart of the transformation calculation, and at the heart of the dot product is a whole load of arithmetic, so let's look at that next.
The arithmetic behind player 2's view
-------------------------------------
Given that Elite does a lot of rotational geometry already, you might assume that we can use one of Elite's many dot product routines for our two-player calculations - perhaps we could use LL51 from the wireframe backface-culling routine, or maybe TAS3 and TAS4 from the tactics and docking routines.
The problem is that all of these routines are optimised for their specific uses; for example, LL51 scales one of its vector arguments so that the magnitude fits into one byte, discarding any data bits that are lost, and both TAS3 and TAS4 simply ignore the low bytes of their 16-bit orientation vector arguments. This makes for fast maths in an environment where we're only really interested in the sign of the dot product and where the value of the dot product occurs within a range, rather than needing to know the exact value.
Unfortunately for two-player Elite, we need all the accuracy we can get, as otherwise player 2's view will jump around too much for a proper combat experience. I know this because the first time I managed to get any meaningful output in player 2's space view, I used TAS3 for the dot product maths, as I was only interested in proving the validity of the algorithm. The test worked (after an awful lot of debugging) and player 1's ship appeared in player 2's view for the very first time, which was a pretty satisfying experience after a couple of weeks of exploding wireframes. But although player 1's ship was in the right place and pointing in the right direction, it did jump around pretty badly; you could literally make out the accumulation of rounding errors in the way the ship stuttered when rotating.
Two-player Elite therefore has its own maths routines that are built around the highest-accuracy multiplication routine from the original code, namely MULT3. This routine multiplies a signed 24-bit number and a signed 8-bit number, returning the result as a signed 32-bit number like this:
K(3 2 1 0) = (A P+1 P) * Q
Note that the word "signed" here refers to Elite's use of sign-magnitude numbers, as opposed to the two's-complement approach of normal 6502 assembly language. The highest bit contains the sign, while the rest of the number contains the (positive) magnitude.
Two-player Elite contains the following high-accuracy maths routines:
- Add24 adds two 24-bit sign-magnitude numbers and returns the result as a 24-bit sign-magnitude number.
- Multiply16x16 multiplies two 16-bit sign-magnitude orientation vectors and returns the result as a 32-bit sign-magnitude number.
- Multiply16x24 multiplies a 24-bit sign-magnitude coordinate by a 16-bit sign-magnitude orientation vector and returns the result as a 32-bit sign-magnitude number.
The multiplication routines break the calculation down into steps, each of which calls MULT3 to do the maths. So, for example, if we consider using Multiply16x24 to multiply a 16-bit sidev orientation vector by a 24-bit x-coordinate, then we calculate the magnitude of the result like this:
  |sidev_x_hi sidev_x_lo| * |x_sign x_hi x_lo|

  =   |sidev_x_hi| * |x_sign x_hi x_lo|
    + |sidev_x_lo| * |x_sign x_hi x_lo| >> 8
and then we apply the correct sign to the result by setting the highest bit as follows:
x_sign EOR sidev_x_hi
We do each multiplication using MULT3, which calculates the following:
K(3 2 1 0) = (A P+1 P) * Q
where both (A P+1 P) and Q are sign-magnitude numbers. We therefore do the entire calculation in steps, like this:
- Do the following calculation in MULT3:
- Copy the result from to K(3 2 1 0) to XX15(3 2 1 0), so we have the following:
- Discard the low byte of the result in XX15 and round up XX15+1 if bit 7 of XX15 is set, so we have this:
- Do the following calculation in MULT3:
- Calculate the following in Add24:
- If bit 0 of sidev_x_lo is set, do the following:
- Apply the following sign bit to the result:
K(3 2 1 0) = |x_sign x_hi x_lo| * |sidev_x_lo >> 1| << 1
XX15(3 2 1 0) = |x_sign x_hi x_lo| * |sidev_x_lo >> 1| << 1
XX15(3 2 1) = (|x_sign x_hi x_lo| * |sidev_x_lo >> 1| << 1) >> 8
K(3 2 1 0) = |x_sign x_hi x_lo| * |sidev_x_hi|
K(3 2 1 0) = K(3 2 1 0) + XX15(3 2 1)
K(3 2 1 0) = K(3 2 1 0) + |x_sign x_hi x_lo|
sidev_x_hi EOR x_sign
Step 1 includes right and left shifts because MULT3 expects sign-magnitude arguments, but sidev_x_lo doesn't have a sign bit as it is the low byte of the 16-bit sign-magnitude number (sidev_x_hi sidev_x_lo). So we shift right to insert a sign bit of zero into bit 7 (thus keeping it positive), do the call to MULT3, and then shift the result back. We then cater for the loss of accuracy in step 6, where we add one more |x_sign x_hi x_lo| to the result if bit 0 of sidev_x_lo is set.
So in essence, steps 1 and 2 do this:
XX15(3 2 1 0) = |x_sign x_hi x_lo| * |sidev_x_lo|
which means step 3 does this:
XX15(3 2 1) = |x_sign x_hi x_lo| * |sidev_x_lo| >> 8
so step 5 does this:
  K(3 2 1 0) = K(3 2 1 0) + XX15(3 2 1)
             =   |x_sign x_hi x_lo| * |sidev_x_hi|
               + |x_sign x_hi x_lo| * |sidev_x_lo| >> 8
which is what we want to calculate.
Given these more accurate arithmetic routines, we can wrap up the coordinate and vector rotation maths into two macros, and can include these in the source whenever we want to rotate vectors or coordinates.
The first macro, ROTATE_VECTORS_16, takes the following arguments:
ROTATE_VECTORS_16 c, v1, v2, v3, w1, w2, w3
This rotates a 16-bit orientation vector in [ v1 v2 v3 ] by another 16-bit orientation vector in [ w1 w2 w3 ] and stores the 16-bit result in the vector c. The calculation is the dot product:
  c = [ v1 v2 v3 ] . [ w1 w2 w3 ]
    = v1 * w1 + v2 * w2 + v3 * w3
where v1, v2, v3 are INWK offsets (so they point to orientation vectors in the current ship data block in zero page), w1, w2, w3 are XX3 offsets (so we need to place the other orientation vector into the XX3 table before using the macro), and c is an offset into the newVectors block (a block where we can store the vector results from multiple rotations). We repeat this calculation nine times to multiply two full sets of orientation vectors (i.e. two rotation matrices).
The second macro, ROTATE_COORDINATE_24, takes the following arguments:
ROTATE_COORDINATE_24 c, v1, v2, v3, c1, c2, c3
This rotates a 24-bit coordinate in (c1, c2, c3) by a 16-bit orientation vector in [ v1 v2 v3 ] and stores the 24-bit result in the coordinate c. The calculation is the dot product:
  c = [ v1 v2 v3 ] . [ c1 c2 c3 ]
    = v1 * c1 + v2 * c2 + v3 * c3
where c1, c2, c3 and v1, v2, v3 are INWK offsets, and c is an offset into the newCoords block (a block where we can store the coordinate results from multiple rotations). We repeat this calculation three times to multiply a ship's coordinates by an orientation vector.
Finally, we also need a DivideBy96 routine that divides a 24-bit number by 96. Elite uses 96 to denote the length of the unit vector, as this enables fractional vector lengths to be represented, so whenever we multiply by an orientation vector, we need to divide the result by 96 to maintain the correct scale factor. Both of the macros above end with this division, and luckily we can reuse Elite's DVID3B2 routine for this, which has an entry point at DVID3B that calculates the following:
K(3 2 1 0) = P(2 1 0) / (S R Q)
So in this case we don't need to roll our own function and DivideBy96 can just be a simple wrapper around a call to the DVID3B entry point with (S R Q) set to (0 0 96).
Target calculations
-------------------
One of the most important aspects of space combat is the ability to target your opponent with your sights, both for shooting lasers and for locking missiles onto targets. Not surprisingly, there's some work to be done to enable two different pilots to target each other (and each other's missiles, for those who prefer to blast enemy missiles out of the sky).
For player 1, nothing changes. The game's local bubble includes player 1 at the centre of the universe, and player 2 is spawned as a ship in slot #2. For two-player Elite, we can therefore reuse the single-player game's targeting routines for player 1, so the HITCH routine can be used to work out whether the ship in INWK is currently in player 1's crosshairs; similarly, the missile logic can be kept and used to manage player 1's missiles, as normal. You can read all about this process in the deep dive on being in the crosshairs.
But what about player 2? Can we just reuse the tactics code from the single-player game? After all, player 2 is spawned in the same way that NPC ships are spawned in the single-player game, and the tactics code works out whether or not an NPC player can hit the single player at the centre of the universe, so can we use this to detect whether player 2 can hit player 1?
The answer turns out to be no, because the code that works out whether an NPC's laser is on-target can get away with being considerably less accurate than the code that works out whether the player's laser is on-target. This is because in the original game, we can't see out of the NPC's cockpit, so we can't tell how accurately each NPC can point its laser.
It turns out that NPC lasers can be wildly off-target but can still register a hit; indeed, if you set player 2 to the AI Pilot in two-player Elite, you can see this in action, as the AI Pilot uses the exact same tactics code as in the original game; the AI Pilot's target can be quite a long way outside the laser sights but the tactics code still registers a hit. This can be changed to require more accuracy from the NPCs, but then you run into limitations in the part of the tactics code that moves NPC ships to point to their target, with the result that NPC ships hardly ever hit anything if you need them to line up their sights properly. For a real-world example of how the tactics routine is less than perfect, see the deep dive on the Elite Demonstration Disc, which applies the same tactics code to the self-playing demo, with predictably fatal consequences.
So for two-player Elite, we need to write our own targeting code for player 2. Luckily, there is a point where we can simply reuse the HITCH routine to work out whether player 2 is targeting another ship, and that's in part 5 of the DrawPlayer2View routine. By this point we have moved the current ship into player 2's frame of reference and have drawn it in player 2's view, so the INWK workspace is all set up with the current ship's coordinates, relative to player 2. So we can call HITCH at this point to see whether the current ship is in player 2's sights, and we can then process missile targeting and laser fire accordingly.
This approach works nicely for missiles, but it also works for player 1's ship. When we process slot #2 in DrawPlayer2View, which contains player 2's ship, the transformation process actually calculates the coordinates and orientation of player 1's ship in player 2's view, so we can call HITCH to work out whether player 2 is pointing at player 1. And because we are using the exact same routine to detect a hit, this makes the process equally fair for each player, and it has the added bonus of taking the ship's targetable area into consideration, so two-player ship choices automatically affect the ease of targeting your opponent.
For missiles, the only slight complication is the need to duplicate all of the missile status variables for player 2, so alongside variables like MSTG, which contains the current missile lock target (for player 1), we need to add variables like player2MSTG to track the lock target for player 2; see the miscellaneous section for more details.
Cheating with the sun and planet
--------------------------------
As discussed in the section on arithmetic, two-player Elite needs to be able to calculate dot products at a higher accuracy than the single-player game, otherwise close-quarters combat is a bit too jumpy. Unfortunately, even with the 24-bit accuracy of the new maths routines, the distant sun and planet can still wobble a bit too much for comfort, as any inaccuracies in the maths are amplified by the larger distances involved.
Luckily we can fix this with some good old smoke and mirrors, because the planet and sun are only there for aesthetic purposes; you can't fly towards them in two-player Elite, so they stay in the background and have no effect on gameplay (though they do have a major impact on immersion and finding your bearings, so they're still important). This lack of movement is achieved by a simple hack in part 6 of the MVEIT routine, so we only apply the player's velocity vector to close-by ships, and not to the planet or the sun.
(To make things a bit less of a mouthful, from now on I will only refer to the planet, but everything I say about the planet also applies to the sun. So when you see "planet", it means "planet and sun", just with fewer words.)
This jumping around only happens in player 2's view, due to inaccuracies in the translation and rotation transformation we explored in the geometry behind player 2's view. So there's a hack in part 2 of DrawPlayer2View that checks whether the planet is currently on-screen in player 2's view, and if it is then we skip the usual application of the two-part transformation, and instead we only move it by the rotations of player 2's controls. This means that the planet doesn't jump around on-screen and instead moves smoothly with the pitch and roll of the player.
Once the planet moves off-screen, we switch back to applying the full two-part transformation, so that it snaps back to the correct position in space. This realignment isn't seen by the player as it's only done when the planet is off-screen, but it can mean that if the planet moves off-screen and then back on-screen quite quickly, it can sometimes appear to have jumped to a new position. Luckily this isn't obvious in fast-paced combat, but if you treat two-player Elite as a gentle stroll through deep space with a friend, then it might be a bit more obvious that something strange is going on behind the curtain.
On top of this cheat, there's another tweak to the normal flow that reduces the amount of on-screen strangeness. Because of the various mathematical approximations used in the ship rotation routines in Elite, and in particular the small angle approximation, we have to "tidy" each ship's orientation vectors periodically to ensure they remain orthonormal; see the deep dive on tidying orthonormal vectors for details.
In normal single-player Elite this isn't too noticeable, because tidying a ship's orientation vectors doesn't change its coordinates in space, it just stretches the ship's shape back into the correct dimensions. As a result, the most you will see is a bit of a wobble in the shape of the ship, which is very hard to see, particularly if the ship is moving.
But in two-player Elite, the orientation vectors are at the core of the two-step transformation process that we use to draw player 2's view, so changing an orientation vector will affect both the coordinates and the orientation of the on-screen ship within player 2's view. As a result, tidying a ship's vectors while it's in player 2's view can make it jump around very noticeably, particularly if the vectors have degraded a long way from being orthonormal. So two-player Elite extends the on-screen checks to the tidying process, so we only tidy the vectors for the planet, the sun and player 1's ship if it isn't being drawn in player 2's view. For missiles, however, we can get away with tidying as we see fit, as they move like the clappers and have a short lifespan, so the chances of vector degradation is low.
This tidying hack has a downside. If you keep the planet, sun or opponent in player 2's view for an extended amount of time, then their orientation vectors will never get tidied and they will start to degrade over time, so player 1's ship will slowly deform, and the planet's circles will get all twisted. But again this is very unlikely to happen during one-on-one combat, so the risk is well worth taking.
Responsive controls for two players
-----------------------------------
Elite has sophisticated support for processing multiple keypresses. It has a key logger that has a number of slots, into which the game records key presses for seven primary controls (pitch, roll, speed and lasers), nine secondary controls (missiles, E.C.M., in-system jump and so on), and one other arbitrary key press. The key logger is refreshed on every iteration of the main loop by scanning the keyboard for the relevant controls and populating the logger, and it enables the game to support a number of keys being pressed at the same time, which is essential in a fast-paced game like Elite. This system is described in more detail in the deep dive on the key logger.
Not surprisingly, the key logger is only designed for one player. If we try to use the original key logger with two players, then the only slot available to the second player is the arbitrary key press slot, and that gets populated by a keyboard scan that stops as soon as it has found a key, irrespective of whether it's being pressed by player 1 or player 2. Obviously, this isn't anywhere near a solution for a two-player game where we need to give both players the same level of control.
Luckily it isn't too difficult to extend the key logger, so two-player Elite adds two more key slots. This gives us enough slots to cover both the primary and secondary controls for the two players, as we don't need to support the full set of key presses from the original game; for example, we can repurpose existing key slots like the energy bomb and in-system jump for player 2's flight controls.
This gives the primary and secondary flight controls for each player the same level of support, so both players can fly their ships and shoot their missiles and lasers without being affected by the other player's actions. But there are a few other controls that we need to support in the two-player version, such as the keys to change between the front, rear, left and right views, and therein lies the problem.
The key logger uses the single-byte "other key press" entry for all these other controls, and it populates this with a scan of the keyboard. This scan works through the keyboard from low internal key numbers to high, and when it detects a key press, it stops and logs that as the "other key". This is fine for one player, but the problem with two players is that if a player holds down a key that appears early on in the full-keyboard scan (i.e. a key with a low internal key number), then that key will fill the "other key press" slot, the keyboard scanning will stop, and any other key presses will be ignored. This means that if player 1 holds down the f0 key to switch to their front view, then because f0 has internal key number &20, this will disable all of player 2's keys that have a higher internal key number. This turns out to be all of them except for the left arrow key, which has an internal key number of &19, so all player 1 has to do to disable a bunch of player 2's keys is to hold down f0. This clearly will not do.
The same issue affects the buttons on the Delta 14B joystick, which we scan in the same keyboard routine when Delta 14B sticks are configured:
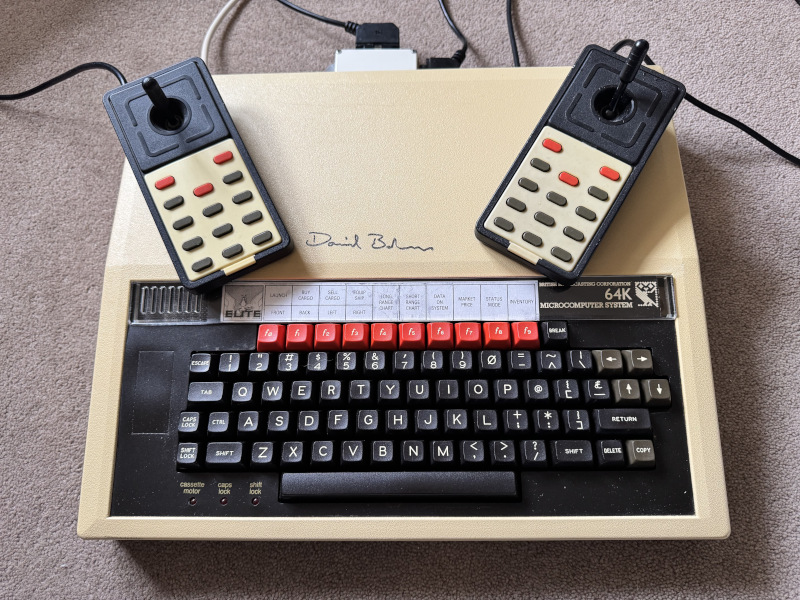
This is because it doesn't matter whether we're talking about keys on a keyboard or buttons on a joystick - the problem is that these extra controls get squashed into just one byte in the logger.
One solution would be to add a second "other key" byte so there's one for each player; we could then reserve one byte for player 1 and the other for player 2, and make sure the keyboard scan only stops early if keys have been detected for both players. It turns out that this approach would need a fair bit of recoding in the parasite code and wouldn't be the fastest solution, so instead I've added a very simple hack to "timeshare" the extra keys between the two players.
The I/O processor, which does the keyboard scanning, contains a new flag variable called player2Turn that flips bit 7 every time the I/O processor is asked to scan the keyboard. When bit 7 is clear, player 1 has precedence, so we make sure we return a player 1 key in the arbitrary key slot, if one is being pressed; and when bit 7 is set, player 2 has precedence, so we make sure we return a player 2 key, if one is being pressed. If the player with precedence is not pressing a key, then we can return the other player's key press, if there is one.
In this way we can stick to the one-byte "other key" slot, and all we need to do is make sure we only abort the keyboard scan early if we find a key press that matches the player with precedence. Because the keyboard is scanned very regularly, this simple system constantly flips precedence between the two players, so neither of them will notice that only one of them has precedence at any one time.
The result is a properly responsive keyboard that shouldn't cause too many arguments. I hope.
Miscellaneous
-------------
Here are some additional points that are worth noting about two-player Elite:
- The shared scanner is a simple consequence of the way DrawPlayer2View works. After the two-step transformation is performed, the current ship has the correct coordinates for drawing the ship in player 2's view... which means it also has the correct coordinates for drawing that ship on the scanner in the correct place for player 2 to use. So DrawPlayer2View calls the SCAN routine to update the ship on the scanner, and we can extend the call to the I/O processor to take an extra argument containing the colour, so player 1's scanner can contain cyan ships and player 2's scanner can contain yellow ships.
- On the subject of the scanner, we can also extend the call to the I/O processor to pass the ship type. This means that that missiles can be drawn with a thin dash at the end of the stick while other ship types are drawn with a thick dot.
- The scanner is zoomed-in by a factor of two compared to the single-player game, to make it easier to work out what's going on in close combat. This only requires a couple of shifts in the I/O processor's SC48 routine, which does the actual drawing.
- All the in-game text is implemented using the game's normal text token system. Two-player Elite disables the game's information screens, as we don't need things like market prices and system descriptions, so there are plenty of tokens that are suitable for conversion into two-player text.
- The main game loop and flight loops are considerably simpler than in the one-player game, as quite a lot of functionality is no longer required. The spawning code has been removed from the main game loop, so that's all of parts 1, 3, 4 and most of part 2 gone. And aspects like the energy bomb, docking, scooping and spawning are no longer needed in the main flight loop, so parts 5, 8, 9, 10 and 14 have been completely removed, as well as large chunks of parts 7, 11, 12, 13 and 15. Going in the other direction, the keyboard and joystick code in parts 2 and 3 of the main flight loop is more complicated, as it duplicates the primary flight control detection for the second player.
- On the subject of duplication, a number of player 1's routines have simply been duplicated for player 2; for example, player 2 has their own missile, laser, shield and energy routines, all of which copy the functionality of the one-player code. Here's a full list of duplicated routines, where a name like Player2XXX indicates that this duplicates the XXX routine from the original game:
- Player2ABORT
- Player2ABORT2
- Player2DENGY
- Player2ECBLB2
- Player2ECMOF
- Player2ee3
- Player2FR1
- Player2LASLI
- Player2LASLI2
- Player2me1
- Player2me2
- Player2me3
- Player2MESS
- Player2OOPS
- Player2SHD
- Player2SPS3
- To go along with these routines, there's also a collection of duplicated variables that are used to store things like player 2's energy levels and laser temperature. These variables can be found at the end of the WP workspace, where a name like player2XXX indicates that this duplicates the XXX variable from the original game. Variables at the start of the block, which appear between the startWP to endZero labels, get zeroed in the ZERO routine, so they contain values that need to be reset at the start of each game by the RESET or RES2 routines; variables after endZero either don't need resetting, or they contain configuration information from the main game screen, which we want to retain between games.
And that's two-player Elite. I hope you enjoy exploring it as much as I enjoyed writing it...